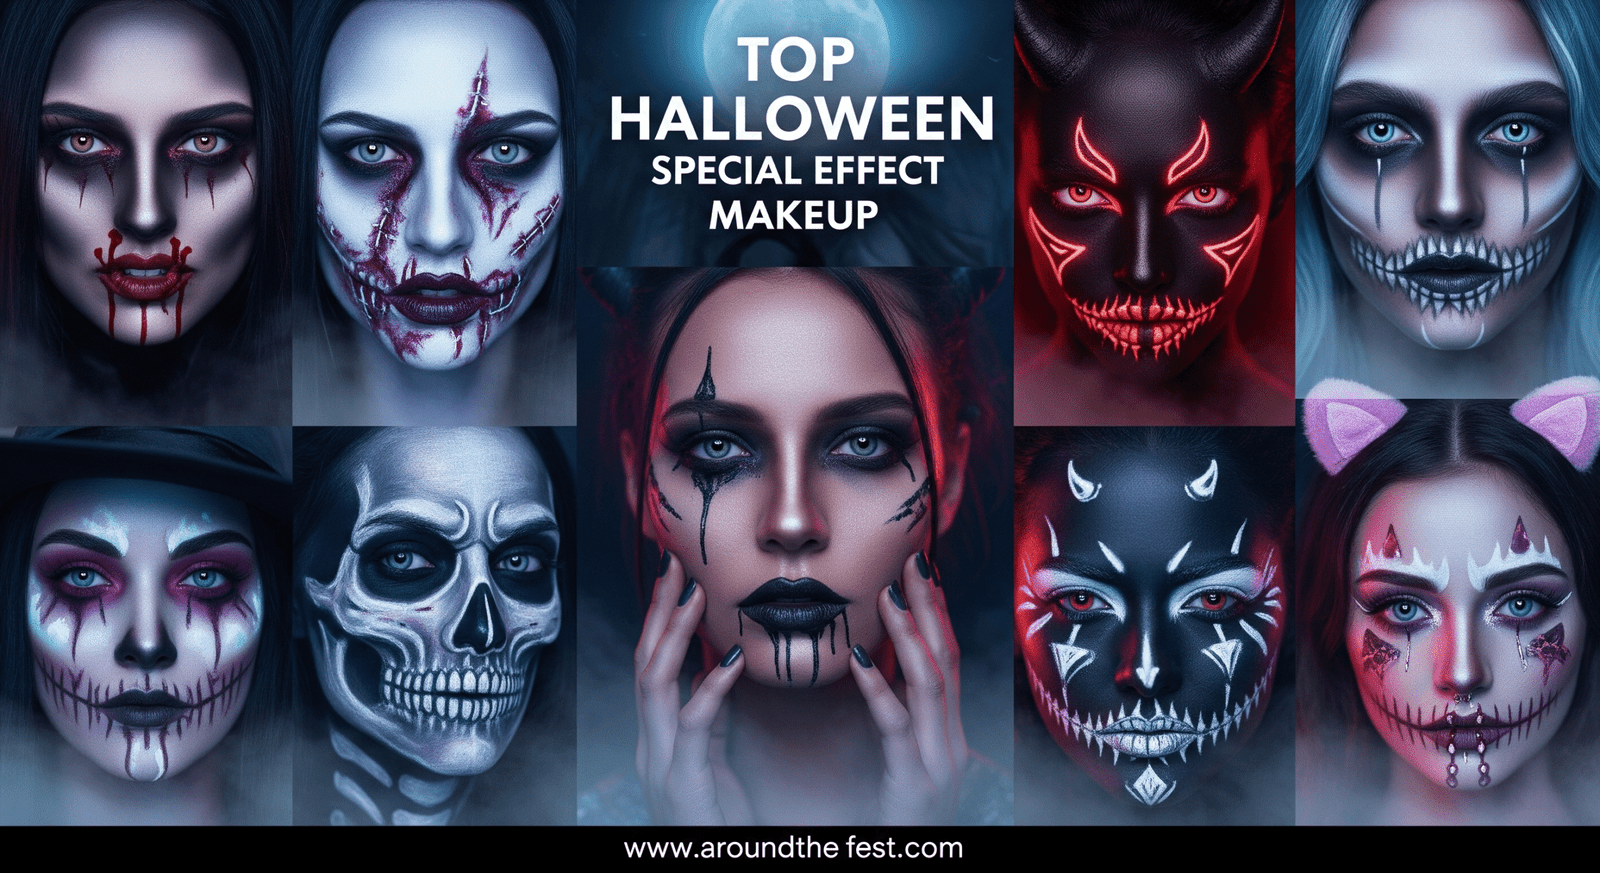
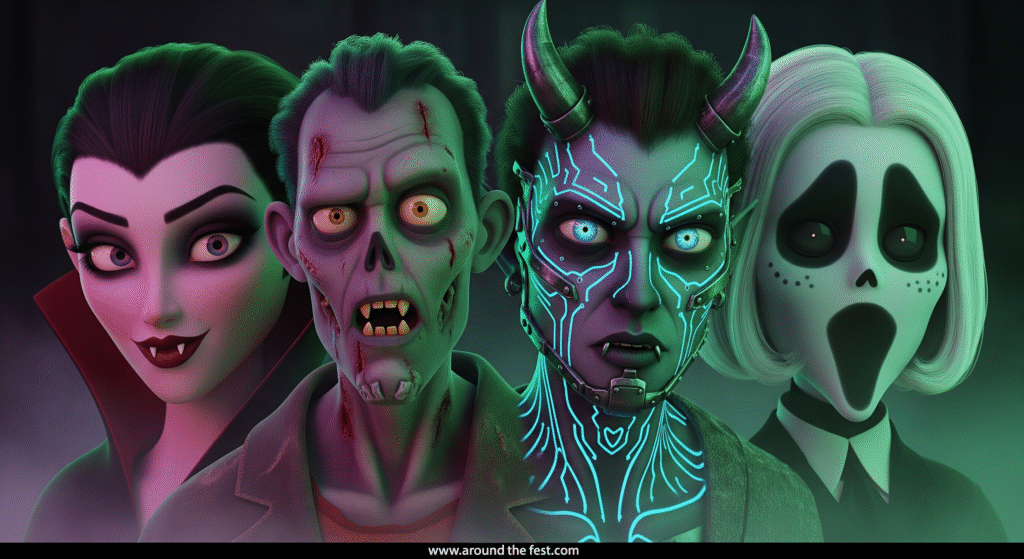
Top Halloween Special Effect Makeup Trends to Try in 2025
What is Halloween Special Effect Makeup?
Halloween Special Effect Makeup is the ultimate way to transform your look this spooky season. Going beyond traditional face paint, it allows you to become anything from a terrifying zombie to a magical fairy. With SFX makeup, you can create dramatic wounds, mystical effects, or whimsical designs that completely change your appearance.
Key elements often include:
Prosthetics – Latex or silicone pieces for realistic wounds, horns, or other features
Face and body paints – Vibrant, long-lasting colors
“Creative textures – from fake blood and glitter to shimmer, layered tissue effects, and beyond.”
“Halloween Special Effect Makeup can turn even the simplest costume into a showstopper, ideal for wowing friends, rocking parties, or creating Instagram-worthy transformations.”
Why it is Trending in 2025
The rise of social media has made Halloween Special Effect Makeup a major trend in 2025. Short videos on TikTok, Instagram Reels, and YouTube Shorts showcase everything from bold scary transformations to hybrid cute-and-spooky looks. Key trends include:
Hybrid designs – Mixing scary and cute, like glittery vampires or pastel zombies
Glow-in-the-dark effects – Neon lines and UV-reactive paint
DIY creativity – Using household items, fake blood, or homemade prosthetics to craft standout looks
This trend is perfect for creators of all skill levels, letting anyone experiment, express creativity, and make a lasting impression.
How Halloween Special Effect Makeup Enhances Costumes
Even basic outfits become extraordinary when paired with Halloween Special Effect Makeup:
Adds Dimension & Realism – A skeleton or skull face instantly transforms your costume.
Tells a Story – Fake wounds, scars, or mystical effects make your character believable.
Personalizes Your Look – Store-bought costumes can feel unique with creative makeup touches.
Boosts Confidence – Wearing bold designs helps you fully embrace your character.
Think of SFX makeup as the final magic touch that elevates any Halloween look.
Overview of Scary, Cute, Easy, and Last-Minute Looks
In 2025, Halloween Special Effect Makeup offers something for everyone:
- Scary & Spooky: Vampires, zombies, skeletons, demons
- Cute & Creative: Pastel fairies, candy-inspired looks, unicorns, mermaids
- Easy & Beginner-Friendly: Half-face skeletons, cat makeup, simple vampire bites
- Quick & Last-Minute: Stickers, glitter, temporary tattoos, neon eyeliner
No matter your skill level or time frame, there’s a perfect SFX look for you.
Tips for This Section:
- Prep your skin with moisturizer for longer-lasting results
- Use cosmetic-grade products, especially for children
- Practice detailed features ahead of time for complex designs
Scary & Spooky Halloween Special Effect Makeup Ideas
Halloween Special Effect Makeup allows you to embrace your dark side, and in 2025, scary and spooky designs are more creative, dramatic, and versatile than ever. From classic vampires to futuristic cyberpunk demons, these SFX trends combine artistry, realism, and a touch of gore to make a lasting impression—whether at parties, haunted houses, or on social media.
1. Vampire Glam
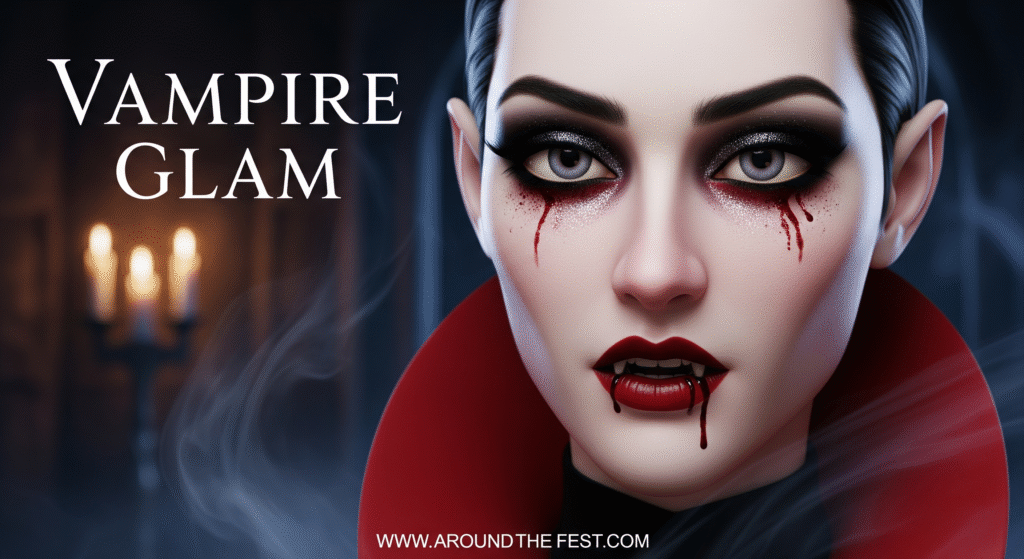
Features: Pale foundation, contoured cheeks, deep red or black lips, dramatic eyeliner
Step-by-Step:
- Apply pale foundation as a base.
- Contour cheekbones and jaw for a sculpted look.
- Fill lips with deep red or black lipstick; add fake blood at the corners for bite effects.
- Apply eyeliner for dramatic eyes; shimmer powder can create a “frozen blood” look.
DIY Alternative: Use red lip liner instead of fake blood for beginners.
Cultural Note: Vampire aesthetics have evolved from Gothic horror to modern glam, making them timeless.
Social Tip: Use translucent contact lenses for an extra eerie effect.
2. Zombie Apocalypse
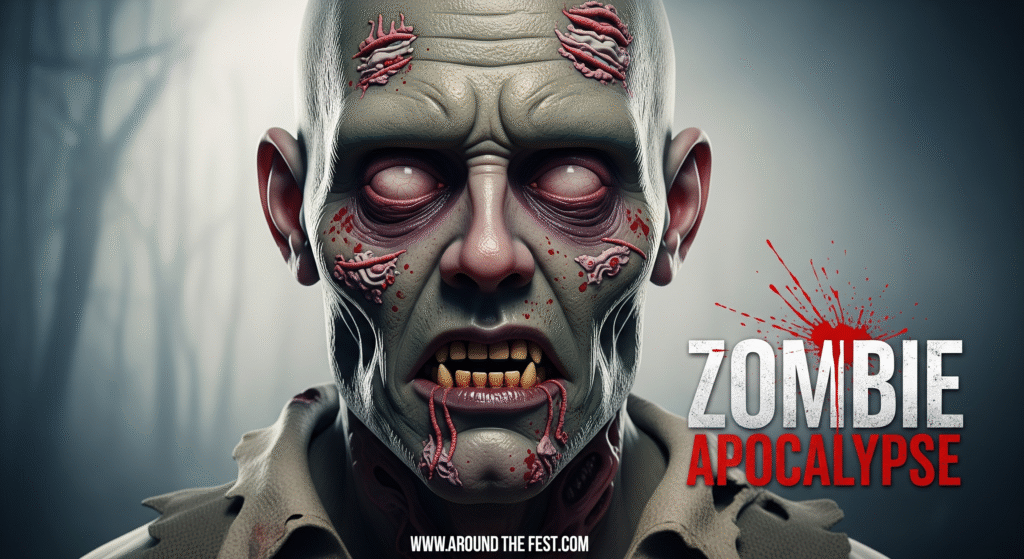
Features: Gray-green mottled skin, hollowed eyes, fake wounds, bruising
Step-by-Step:
- Apply gray-green base over the face and neck.
- Use tissue + liquid latex to create layered wounds.
- Add bruise shades (purple, red, yellow) around eyes and scars.
Optional: tear, dirt, or blood splatter on clothing.
DIY Tip: Cocoa powder or eyeshadow can substitute for bruising colors.
Storytelling: Zombies can be part of a group apocalypse or personal horror narrative.
3. Creepy Doll Eyes
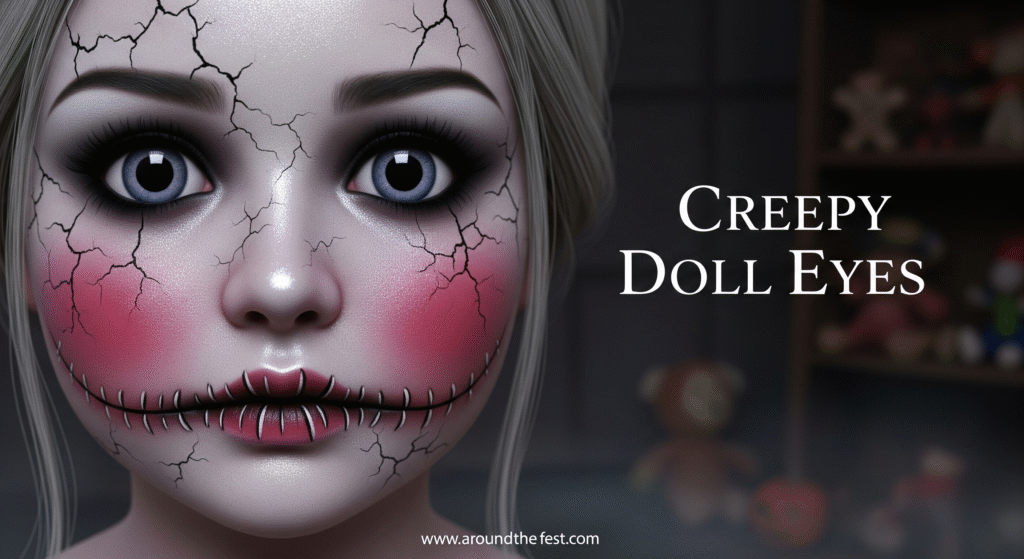
Features: Cracked porcelain skin, oversized pupils, rosy blush
Step-by-Step:
- Apply pale foundation.
- Draw fine cracks with black eyeliner; highlight with white or shimmer.
- Add blush and exaggerated circle lenses for large pupils.
Optional: stitched mouth illusion for “moving doll” effect.
Why It Works: Dolls symbolize innocence turned sinister.
DIY Tip: Use face paint pens if fine liners aren’t available.
4. Skeleton Face
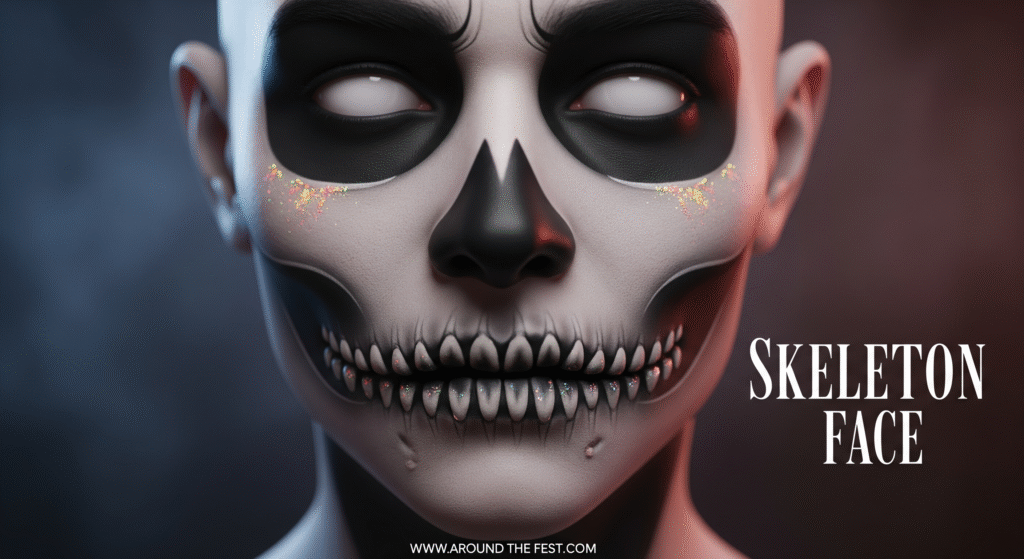
Features: Black-and-white skull makeup, optional neon/glitter accents
Step-by-Step:
- Use white foundation as a base.
- Draw hollow eyes, nose, and jaw lines with black paint.
- Blend black shadows for depth; add glitter or neon for a modern twist.
DIY Tip: Half-face skeletons are beginner-friendly.
Cultural Note: Skeleton makeup is inspired by Dia de los Muertos and classic horror.
5. Witches & Dark Sorcery
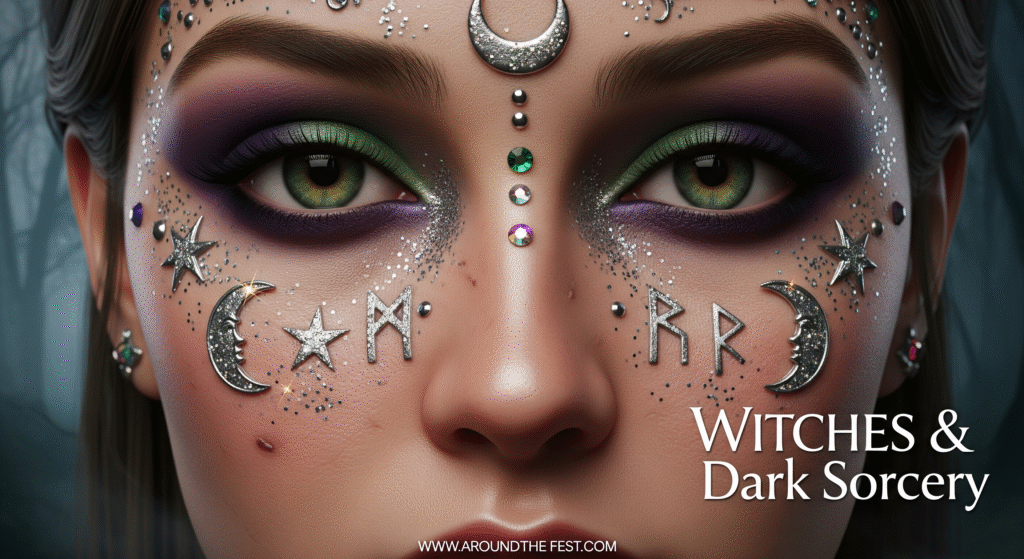
Features: Smoky eyes, mystical symbols, green/purple tones
Step-by-Step:
- Blend green/purple shades on eyelids and cheeks.
- Draw mystical symbols with metallic liners.
- Add glitter or rhinestones for magical shimmer.
DIY Tip: Stickers or temporary tattoos can mimic symbols.
Why It Works: Witch makeup offers endless creative freedom.
6. Ghostly Apparitions-Halloween Special Effect Makeup

Features: Pale translucent skin, hollow eyes, smoky lips
Step-by-Step:
- Apply pale foundation; blend slightly with translucent powder.
- Darken eyes with gray/black shadow for hollowness.
- Add floating glitter or glowing orbs with white eyeliner for a spectral effect.
Optional Accessories: Victorian lace, vintage hairstyles.
Social Tip: Perfect for dramatic selfies or low-light environments.
7. Scarecrow Face-Halloween Special Effect Makeup
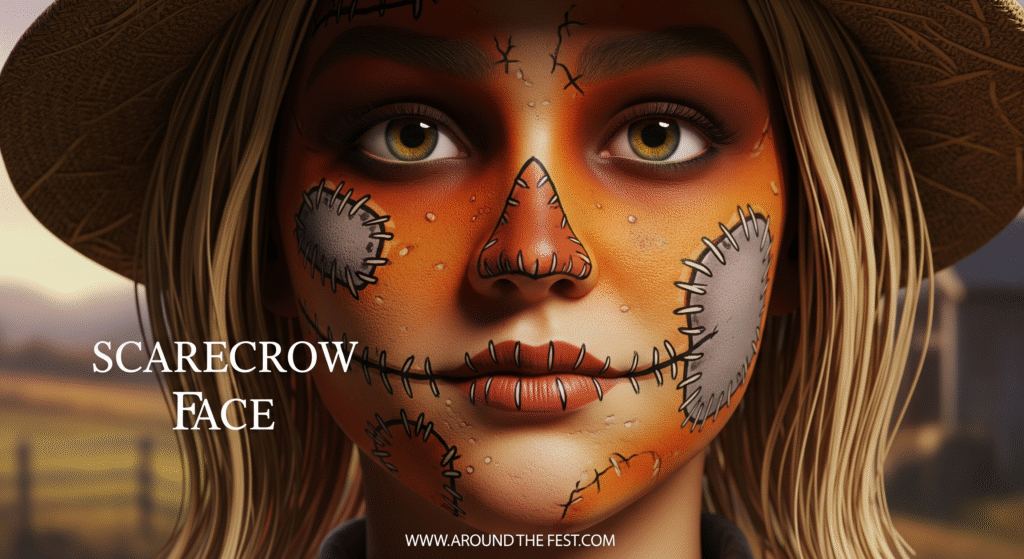
Features: Patchwork patterns, stitched mouth, triangular nose, exaggerated eyes
Step-by-Step:
- Use orange and brown tones for the base.
- Draw patchwork seams and stitches with black eyeliner.
- Add straw, fabric, or a hat to complete the look.
DIY Tip: Brown eyeliner and tissues can mimic stitched patches.
Why It Works: Combines spooky and playful vibes, great for group costumes.
8. Demon or Fiend-Halloween Special Effect Makeup
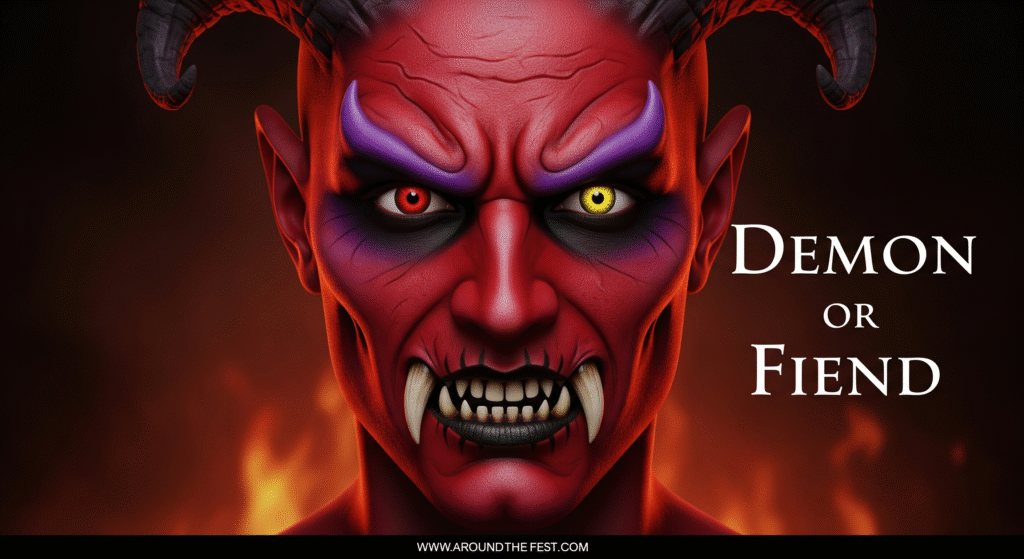
Features: Red/purple base, horns, blackened teeth
Step-by-Step:
- Apply red/purple base across face and neck.
- Add prosthetic horns or contour cheekbones for a sinister shape.
- Use black paint for teeth; glowing contact lenses optional.
DIY Tip: Use paper/fabric horns if prosthetics are unavailable.
Why It Works: High-impact, bold Halloween transformation for advanced SFX.
9. Slasher / Horror Movie Inspired-Halloween Special Effect Makeup

Features: Cuts, bruises, blood spatters
Examples: Friday the 13th, Halloween, custom characters
Step-by-Step:
- Apply base foundation.
- Layer bruises with red, purple, and yellow tones.
- Use liquid latex or tissue for cuts/wounds; fake blood for splatter.
Why It Works: Instantly recognizable, nostalgic, and appealing to horror fans.
10. Werewolf Transformation-Halloween Special Effect Makeup
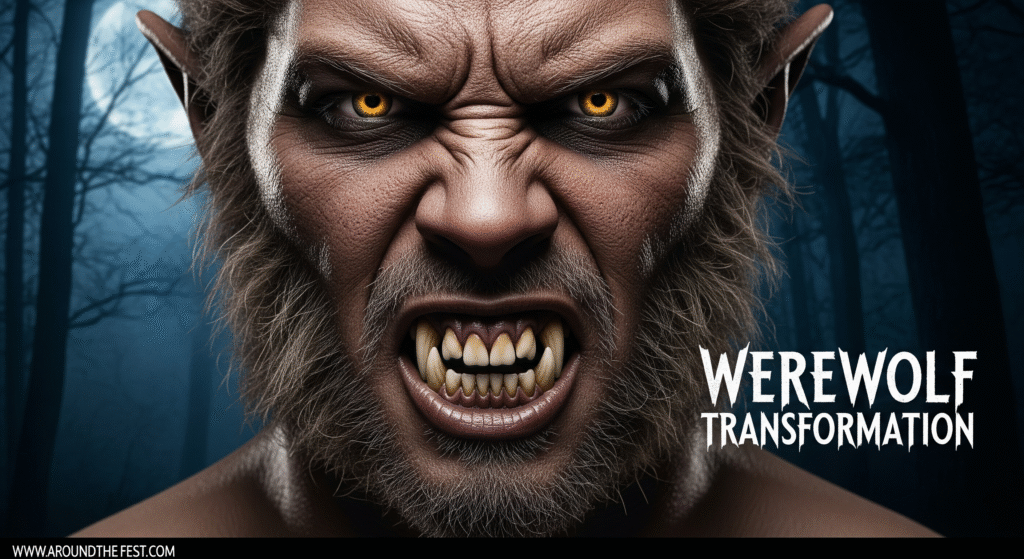
Features: Brown/gray shading, furry textures, sharp teeth
Step-by-Step:
- Contour face and neck with brown/gray tones.
- Attach faux fur or brush fine hair textures along cheeks/jaw.
- Optional: glowing or animalistic contacts.
Why It Works: Classic creature transformation with thrilling effect.
11. Monster Mash-Up-Halloween Special Effect Makeup
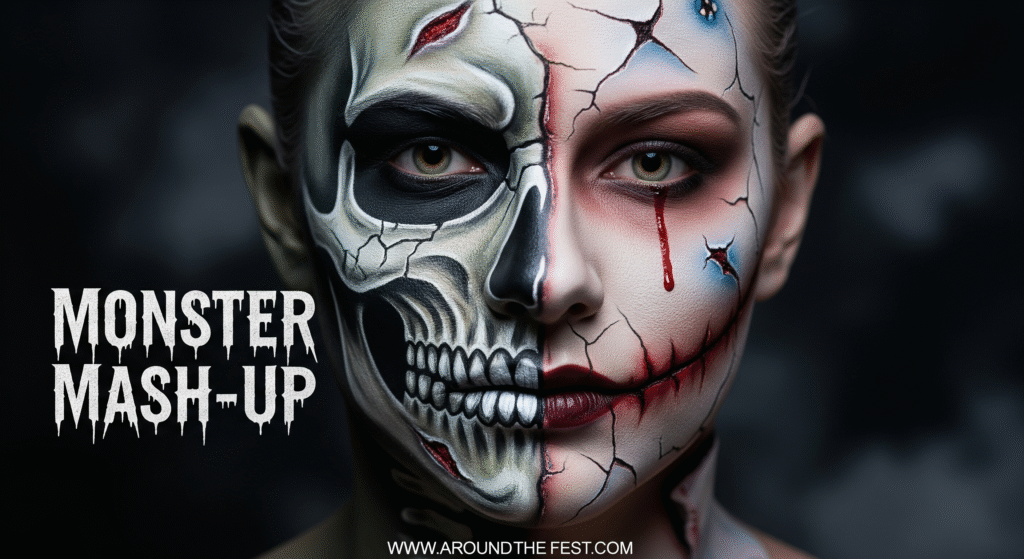
Features: Combine zombie, skeleton, vampire, or cracked porcelain effects
Step-by-Step:
- Pick two or more designs.
- Layer colors, textures, and prosthetics for hybrid effect.
- Blend transitions between styles for coherence.
Why It Works: Shows creativity; allows unique signature looks.
12. Victorian Ghost-Halloween Special Effect Makeup
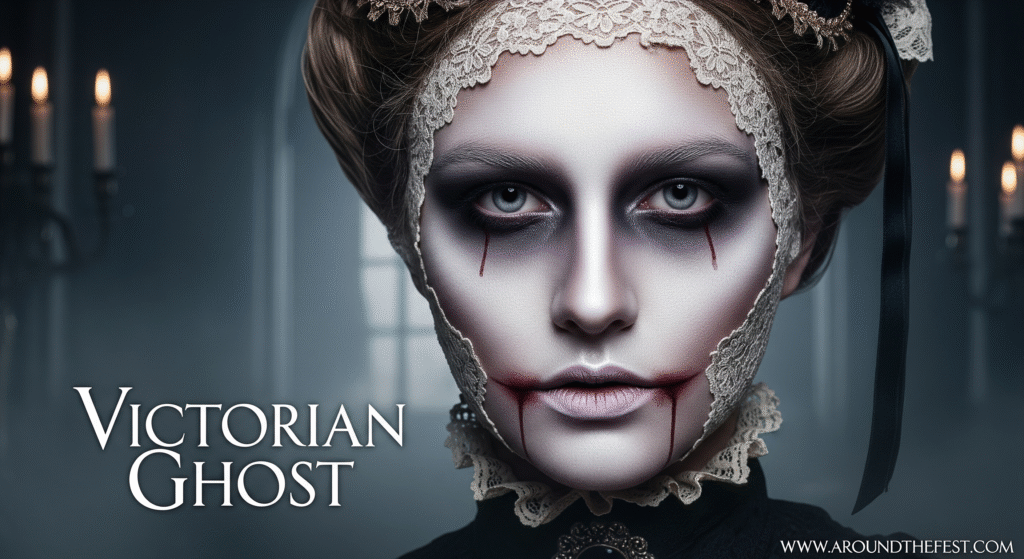
Features: Pale porcelain skin, dark hollow eyes, subtle bloodstains
Step-by-Step:
- Pale foundation with light shimmer.
- Hollow eyes with gray/black shadows.
- Add lace or vintage accessories for elegance.
Why It Works: Haunting high-society aesthetic; sophisticated and eerie.
13. Holographic Alien-Halloween Special Effect Makeup
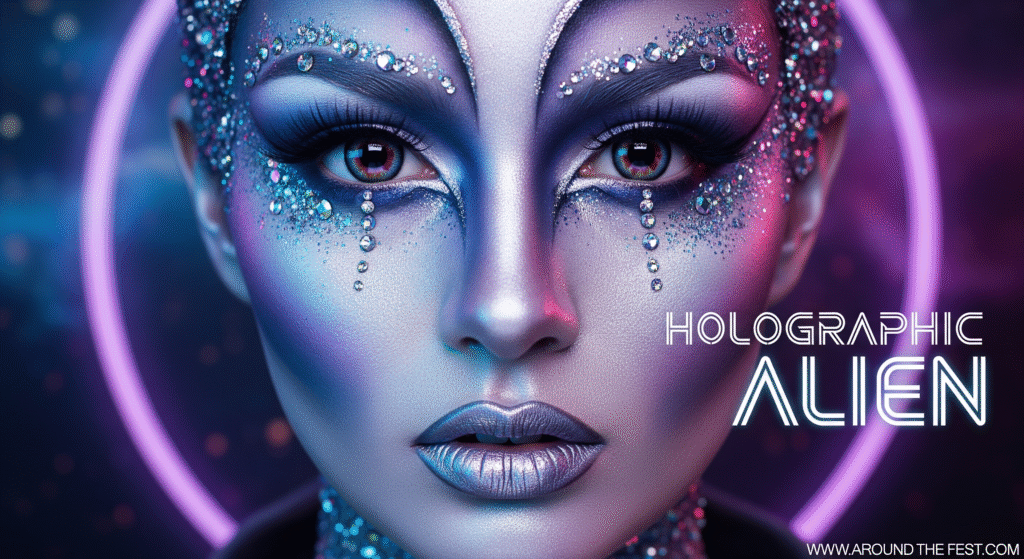
Features: Iridescent skin tones, exaggerated eye shapes, metallic accents
Step-by-Step:
- Apply a pale or silver base foundation.
- Blend iridescent powders or shimmer paints across the forehead, cheekbones, and chin.
- Contour with metallic shades to accentuate exaggerated facial shapes.
- Add metallic or glitter accents around eyes, temples, and lips.
- Optional: wear colored contact lenses for an otherworldly look.
DIY Tip: Use highlighter and metallic eyeshadows if holographic powders are unavailable.
Pro Advice: Photograph under mixed lighting to maximize holographic effect.
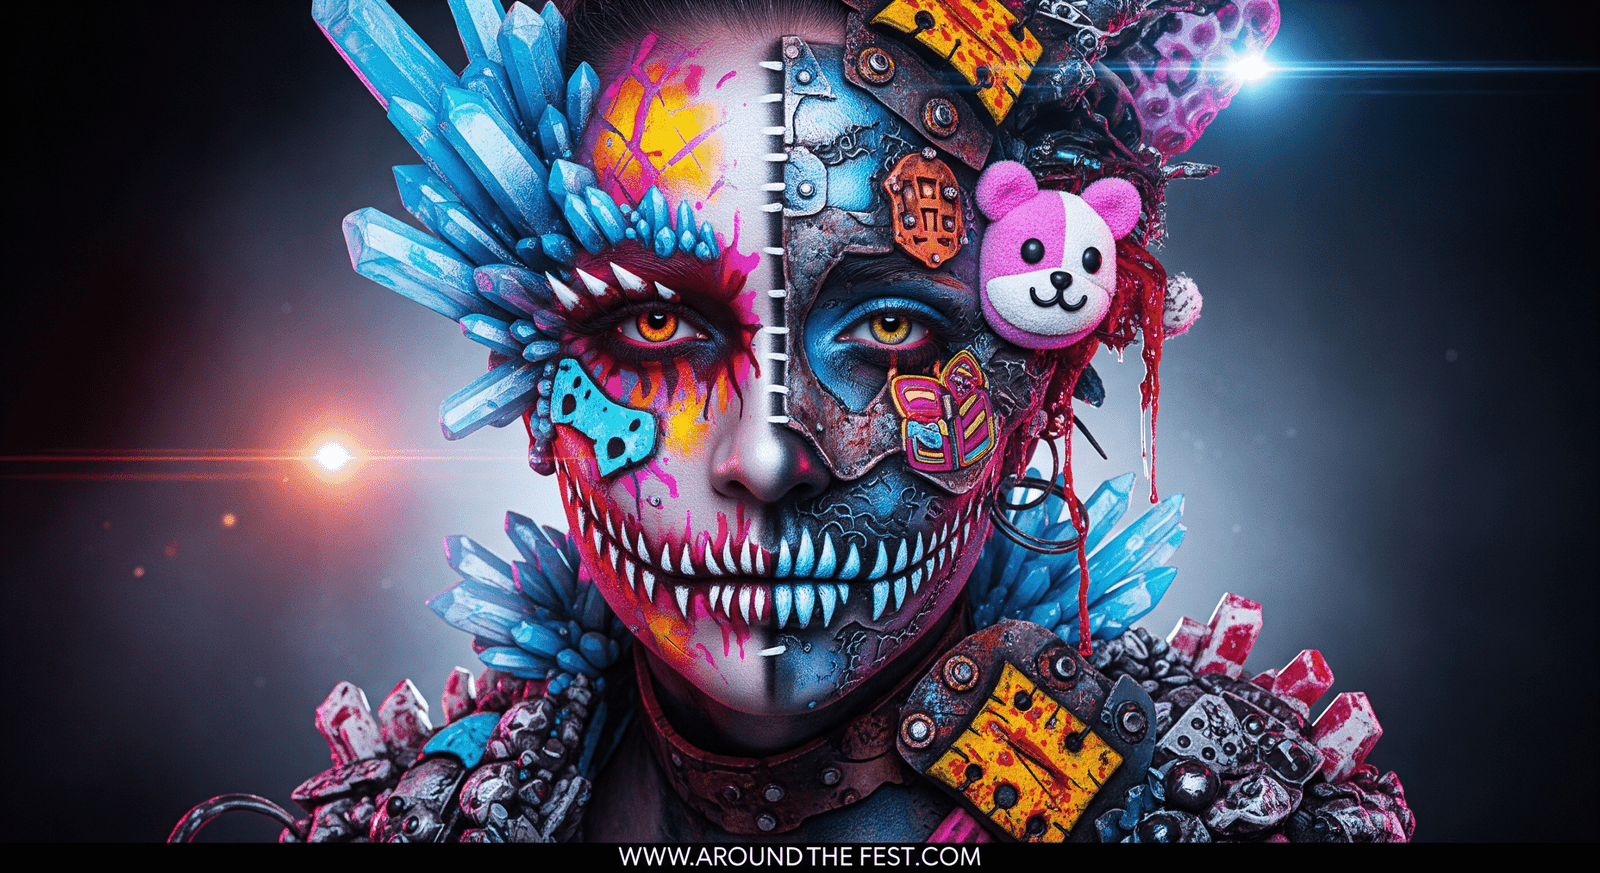
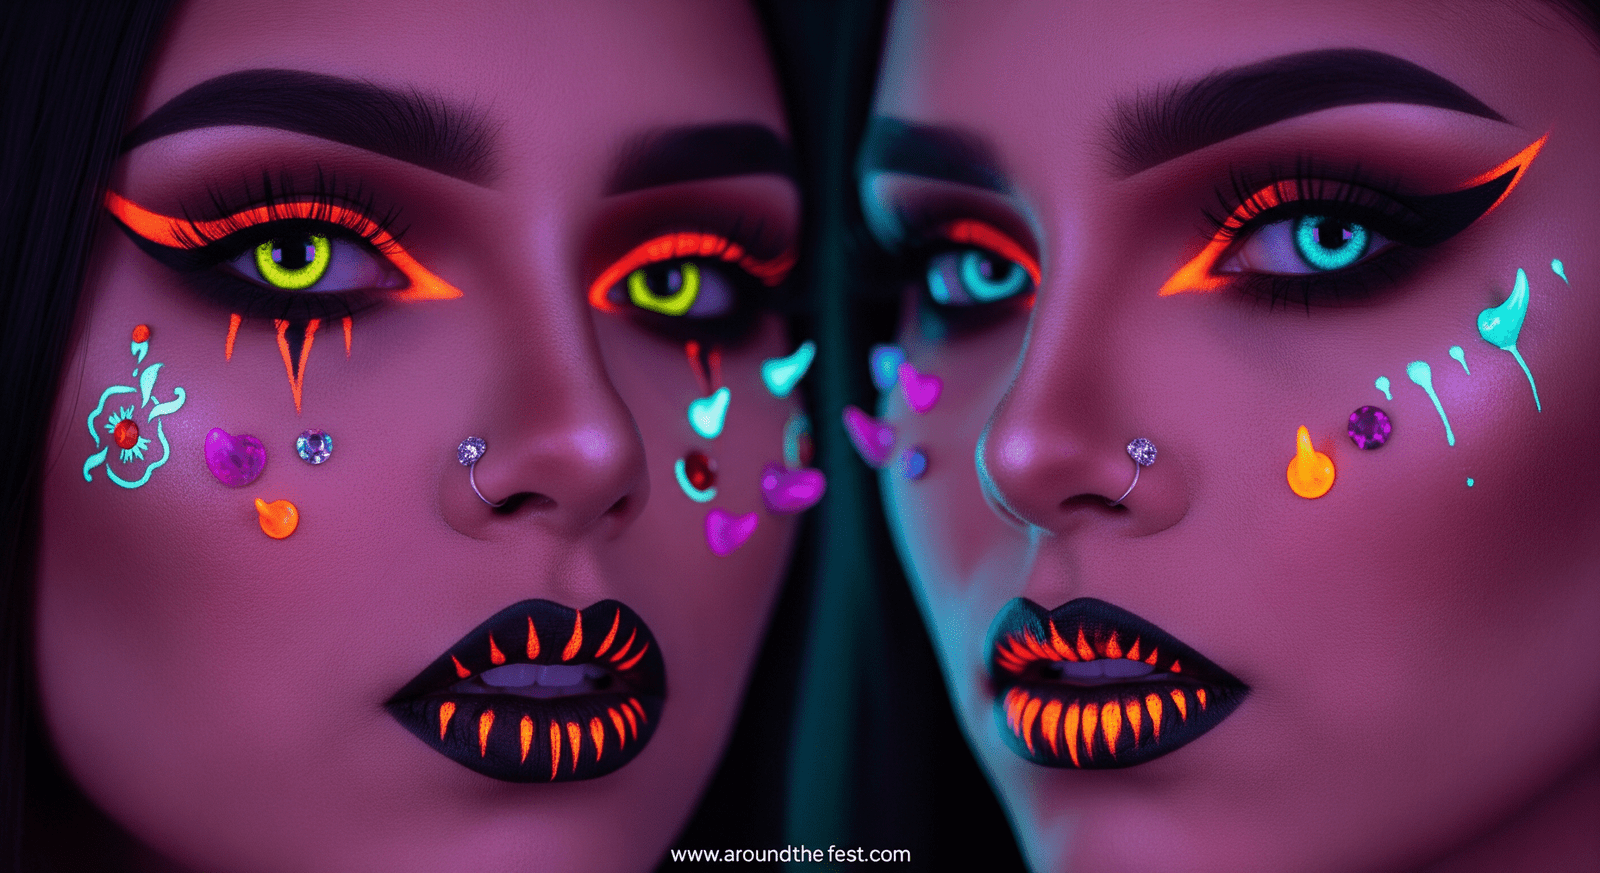
14. Cyberpunk Neon Demon-Halloween Special Effect Makeup
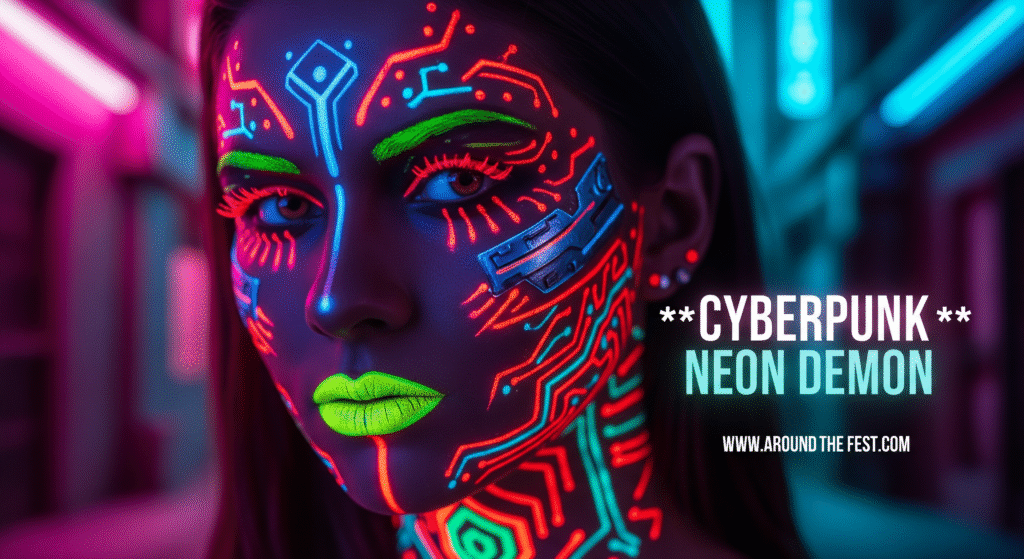
Features: Neon face paints, glowing tattoos, circuit patterns, metallic prosthetics
Step-by-Step:
- Apply a neutral or metallic base foundation.
- Use UV-reactive or neon face paints to draw circuit-like lines across forehead, cheeks, and jaw.
- Add contouring with dark shades to enhance facial structure.
- Apply prosthetic pieces (horns, metallic implants) if available.
- Optional: use UV makeup spray for glowing effect under blacklight.
DIY Tip: If no prosthetics, draw 3D “metal” shapes with silver and gray face paint.
Pro Advice: Set with setting spray to prevent neon paints from smudging.
15. Vampire Queen with Crystal Accents-Halloween Special Effect Makeup

Features: Deep red/black makeup, crystal embellishments around eyes/forehead
Step-by-Step:
- Apply pale foundation and contour for a sharp, regal look.
- Fill lips with dark red or black lipstick.
- Use red or purple eyeshadow to intensify the eyes.
- Attach small crystals around the eyes and forehead using cosmetic adhesive.
- Optional: wear a crown or dark jewelry to complete the royal look.
DIY Tip: Rhinestones from craft stores work as crystal alternatives.
Pro Advice: Keep the adhesive gentle to avoid skin irritation.
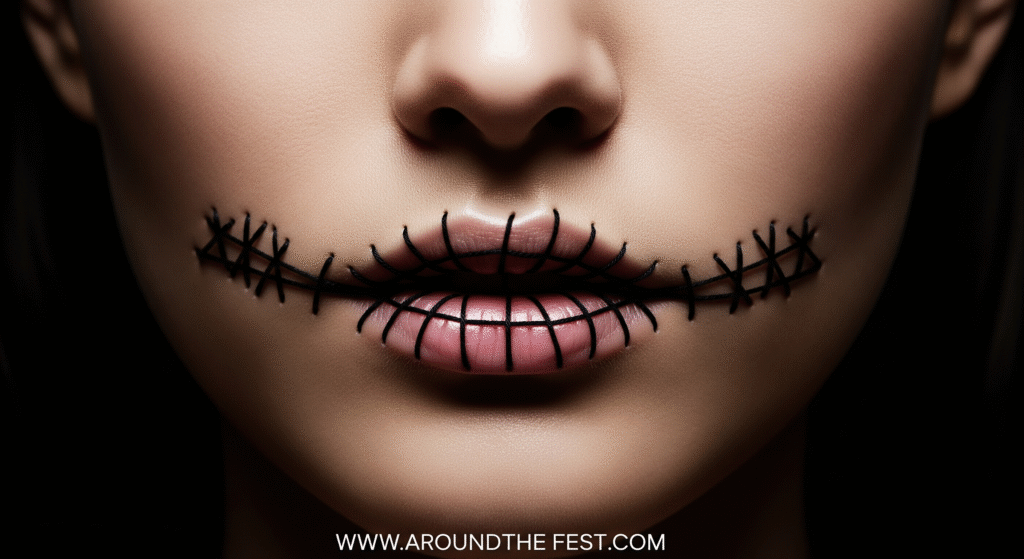
16. Haunted Doll with Moving Mouth Illusion-Halloween Special Effect Makeup

Features: Stitched mouth painted to appear as if it moves
Step-by-Step:
- Apply pale foundation to the entire face.
- Draw a stitched mouth line with black eyeliner; add small “stitches” along it.
- Use white or silver eyeliner to create highlights for the illusion of depth/movement.
- Optional: add blush or cracks for more realism.
DIY Tip: Use face paint pens for fine lines instead of professional SFX brushes.
Pro Advice: Practice in front of a mirror to perfect the “animated” effect.
17. Gothic Angel with Feathered Wings-Halloween Special Effect Makeup
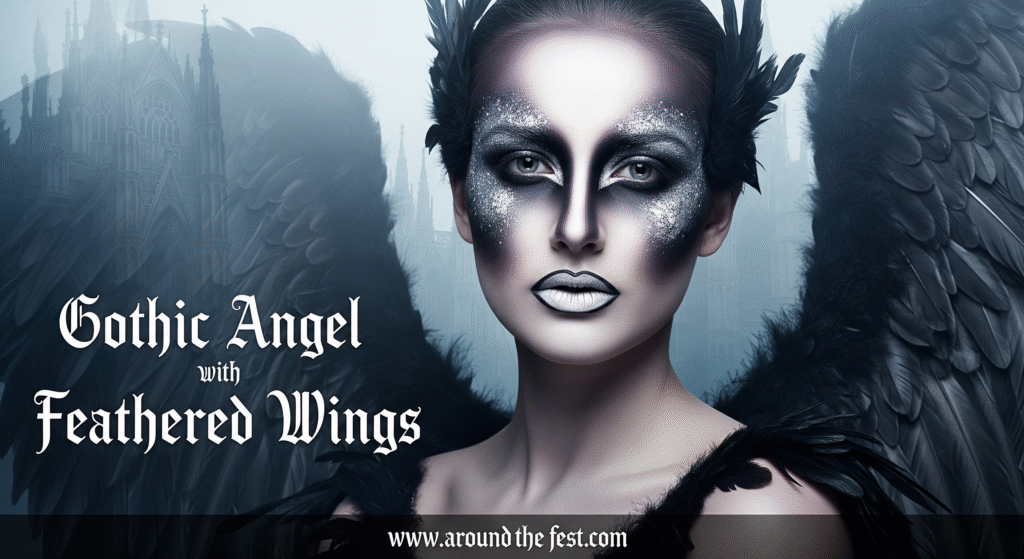
Features: Black and silver tones, feathered wings
Step-by-Step:
- Apply pale foundation as base.
- Contour eyes with dark gray or black eyeshadow; add silver highlights.
- Apply black lipstick or gradient lip effect.
- Attach small feather accessories around temples or shoulders.
- Optional: full feather wings if available.
DIY Tip: Use black craft feathers or feathered headbands for costume integration.
Pro Advice: Use light shimmer on wings and face for dramatic lighting in photos.
18. Underwater Creature with Bioluminescent Features
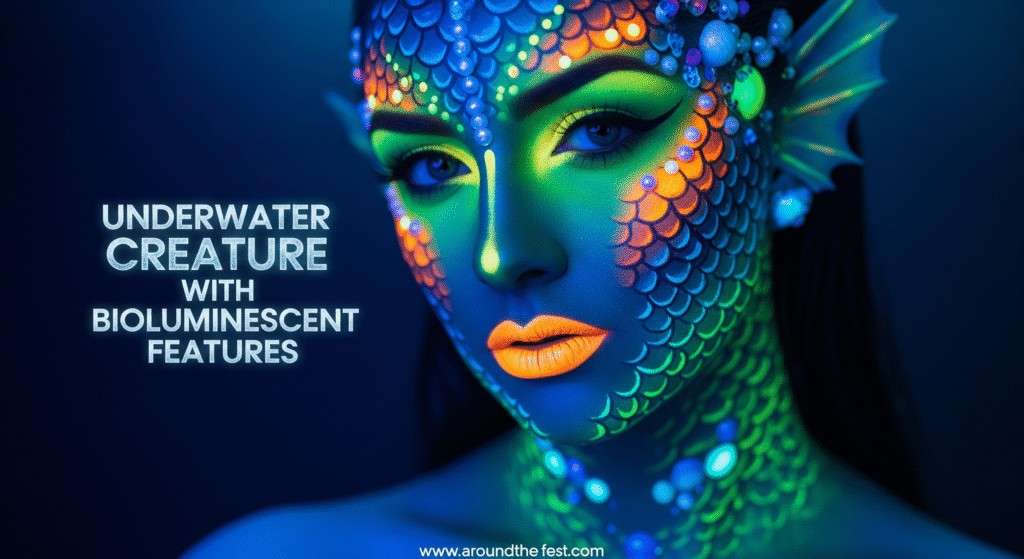
Features: Neon blues and greens, glow-in-the-dark paints
Step-by-Step:
- Apply blue or green base foundation across face, neck, and shoulders.
- Blend lighter neon colors along cheekbones and temples.
- Add scales using a fishnet or stencil pattern and shimmer/glow paints.
- Optional: add pearls, sequins, or shells for texture.
DIY Tip: Use washable neon face paints if UV-reactive products are unavailable.
Pro Advice: Apply in thin layers to prevent caking and maximize glow.
19. Time Traveler with Temporal Scars-Halloween Special Effect Makeup
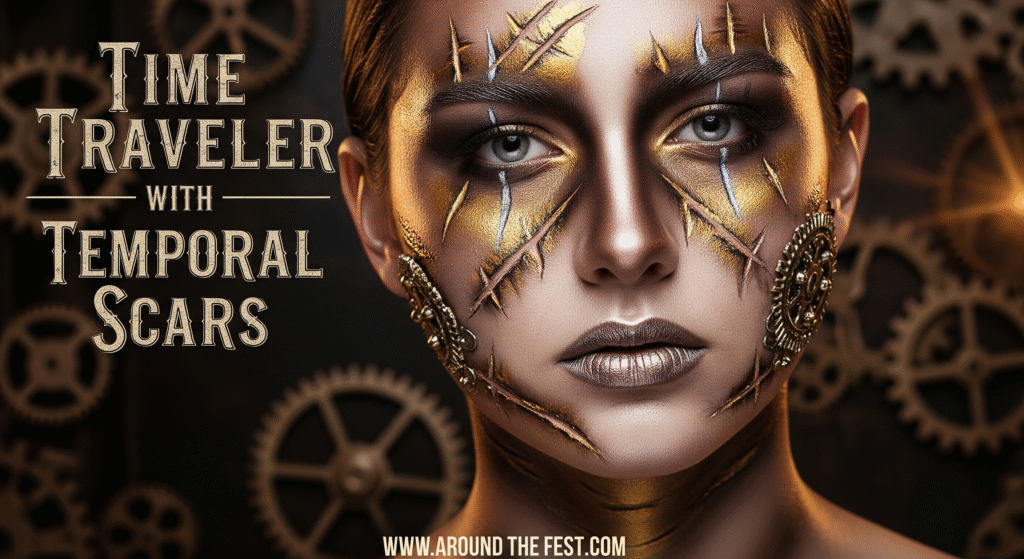
Features: Metallic scars, clockwork/gear-inspired accents
Step-by-Step:
- Apply neutral base foundation.
- Draw scar lines with metallic gold or silver face paint.
- Use small stencils or hand-paint gear and clockwork patterns on cheeks, forehead, and neck.
- Optional: add prosthetic gears or raised metallic pieces with cosmetic adhesive.
DIY Tip: Aluminum foil or metallic stickers can mimic gears if prosthetics aren’t available.
“Pro Tip: Combine layered paint with metallic powders to achieve lifelike depth.”
20. Haunted Mirror Reflection-Halloween Special Effect Makeup
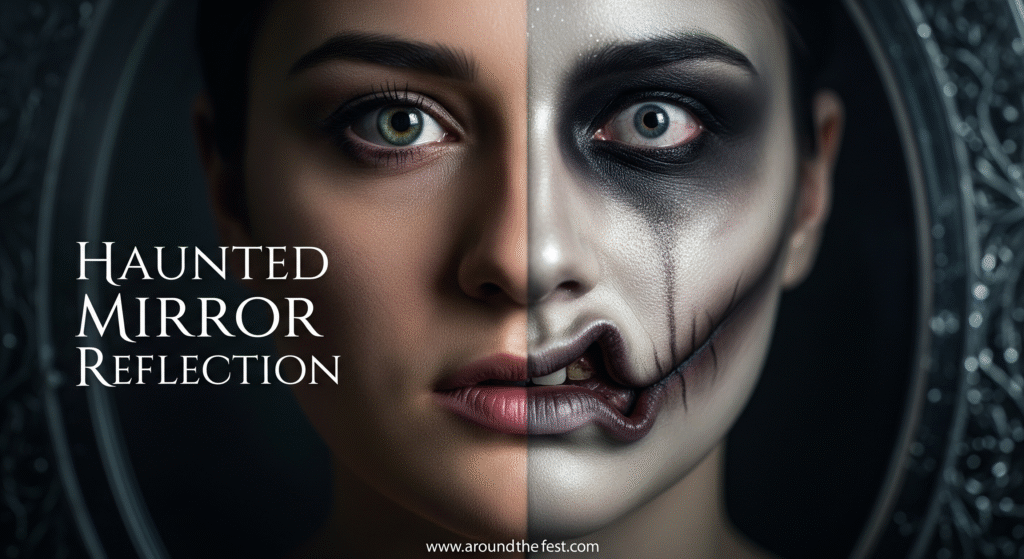
Features: One side of face mirrors the other, distorted/ghostly
Step-by-Step:
- Split the face visually down the center using a neutral eyeliner pencil.
- Apply normal makeup on one side.
- On the mirrored side, distort features slightly (e.g., elongated eyes, warped mouth) using darker shades and smudging.
- Optional: add ghostly highlights with white eyeliner or shimmer powder.
DIY Tip: Use face paint pens for precision in the distorted side.
Pro Advice: Take photos from angles that emphasize the mirrored effect.
21. Cursed Mummy with Glowing Eyes-Halloween Special Effect Makeup
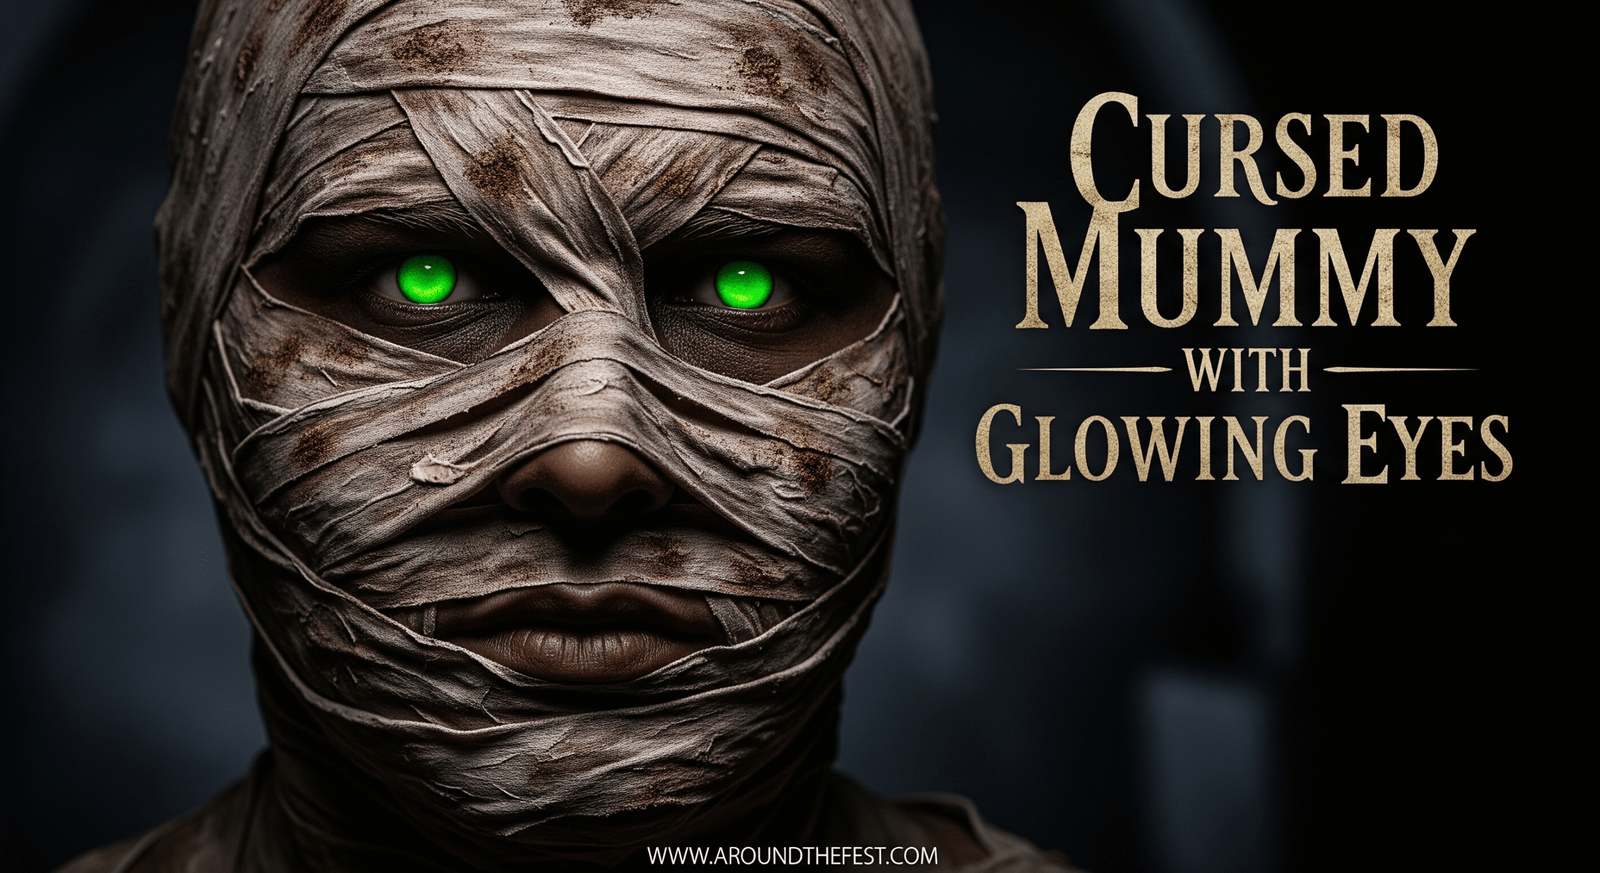
Features: Textured, bandage-like makeup, UV-reactive glowing eyes
Step-by-Step:
- Apply pale base foundation.
- Apply a sticky base of latex or cosmetic adhesive, lay down narrow tissue strips in overlapping rows, and stipple to build a bandaged surface.
- Add shadow and dirt tones for aged, cursed look.
- Apply UV-reactive paint around the eyes for glowing effect.
DIY Tip: Cotton strips or gauze can replace professional SFX bandages.
Pro Advice: Test UV paint on small area first to avoid skin irritation.
Tips for All Scary SFX Looks
- Always start with clean, moisturized skin.
- Set makeup with translucent powder or setting spray.
- Layer colors gradually for depth and realism.
- Use high-quality paints, prosthetics, and brushes for best results.
- Enhance with props, accessories, and contacts to elevate impact.
- Consider lighting and photography angles for social media.
- Experiment with DIY alternatives like tissue, cocoa powder, or temporary tattoos.
Cute & Creative Halloween SFX Trends for 2025
Not all Halloween makeup has to be terrifying. In 2025, cute, whimsical, and creative SFX trends are rising, combining glitter, pastel colors, magical elements, and playful gore for a fun, eye-catching transformation. Perfect for kids, teens, or anyone who wants a lighter, imaginative look, these trends allow maximum creativity with minimal scariness.
1. Fairy Glitter Look-Halloween Special Effect Makeup
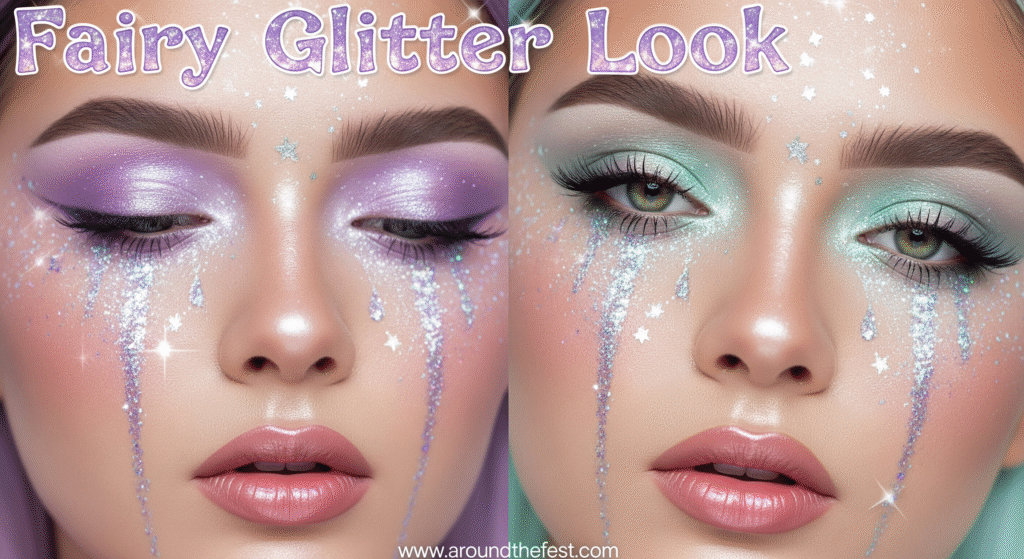
Features: Pastel foundation, glitter tears, star accents, soft shimmer
Step-by-Step:
- Apply a pastel base foundation (lavender, pink, or mint) evenly across the face.
- Highlight cheekbones and eyelids with light shimmer or highlighter.
- Draw tiny stars or sparkles with cosmetic glitter or face paint.
- Apply glitter tears along lower lash line for magical effect.
DIY Tip: Use loose cosmetic glitter over a cream base; stick stars from craft stores with eyelash glue.
Pro tip: Pick hypoallergenic cosmetic glitter to avoid irritation, and add shimmer in light layers for extra depth.
2. Unicorn & Rainbow Styles-Halloween Special Effect Makeup
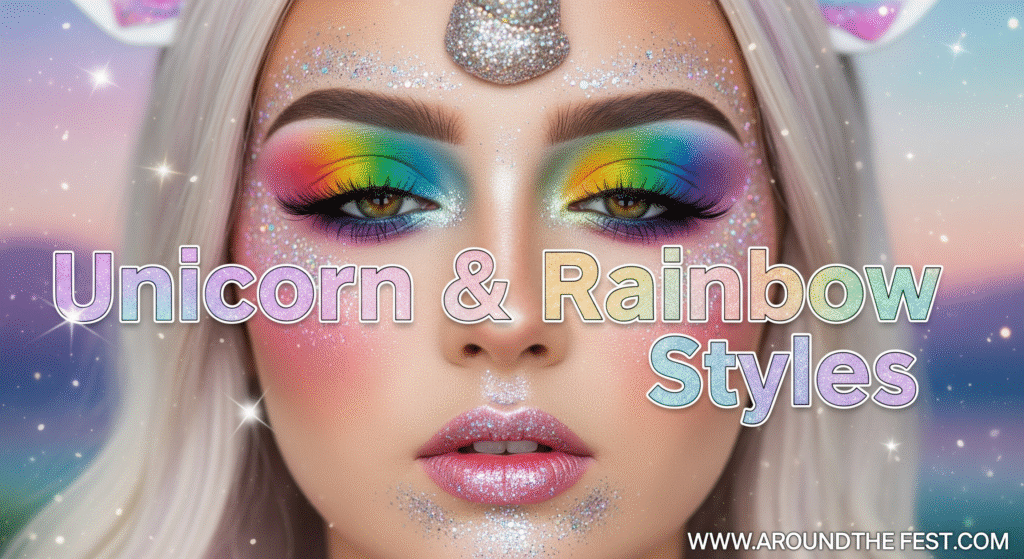
Features: Rainbow eyeshadow, glitter horns, pastel blends
Step-by-Step:
- Apply a neutral base foundation.
- Create rainbow eyeshadow using soft gradients across eyelids.
- Draw or secure a small glitter unicorn horn at the center of the forehead.
- Add glitter highlights to cheeks, lips, and temples.
DIY Tip: Use rainbow-colored eyeshadow pencils if powder palettes aren’t available.
Pro Advice: Blend colors seamlessly; use light spray of setting spray to hold glitter.
3. Candy / Pop Art Inspired-Halloween Special Effect Makeup
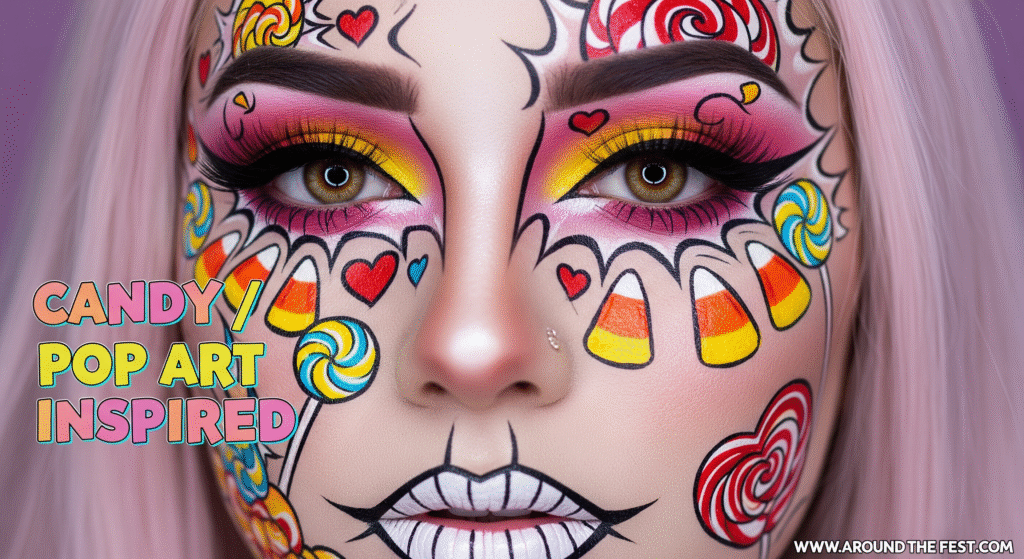
Features: Bold lines, lollipop swirls, candy corn color palettes
Step-by-Step:
- Apply pale or pastel base foundation.
- Draw candy-themed shapes (swirls, hearts, lollipops) with face paints or eyeliner.
- Outline shapes with black liner for comic-book style.
- Add bright highlights to mimic shiny candy.
DIY Tip: Use colored pens or lipstick to draw designs if face paints aren’t available.
Pro Advice: Focus on one feature at a time for clarity; perfect for Instagram photos.
4. Cute Horror / Gore-Core-Halloween Special Effect Makeup
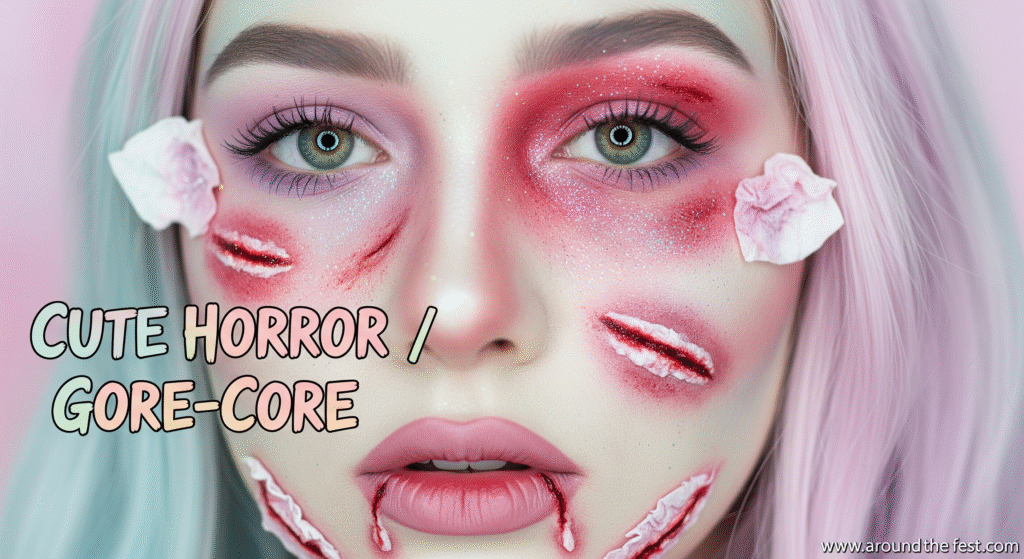
Features: Playful wounds, pastel gore, soft bruises
Step-by-Step:
- Apply pastel base foundation.
- Create fake wounds with tissue + liquid latex or pastel reds/pinks.
- Blend edges to soften look—make gore “cute” not scary.
- Add glitter or pastel highlights to emphasize whimsical style.
Natural option: Build bruise undertones with cocoa powder for a soft-focus purple‑brown cast, ideal for pastel SFX.
Pro Advice: Layer subtle effects; avoid heavy blood for truly cute aesthetic.
5. Magical Mermaid-Halloween Special Effect Makeup
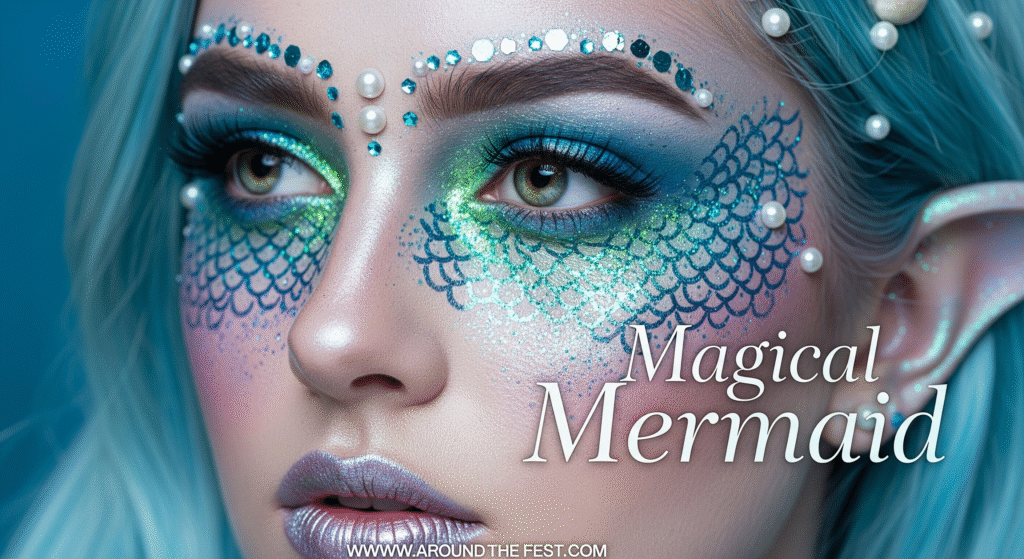
Features: Scales, glitter highlights, ethereal blues/greens
Step-by-Step:
- Apply pastel or shimmery base foundation.
- Use a fishnet stencil to create scale patterns; fill in with metallic or glitter paint.
- Highlight eyes and cheeks with shimmer.
Optional: attach seashells or pearls along temples and hairline.
DIY Tip: Glitter eyeliner can mimic scales if paints aren’t available.
Pro Advice: Use water-resistant glitter or paints for longevity.
6. Hybrid Cute + Scary
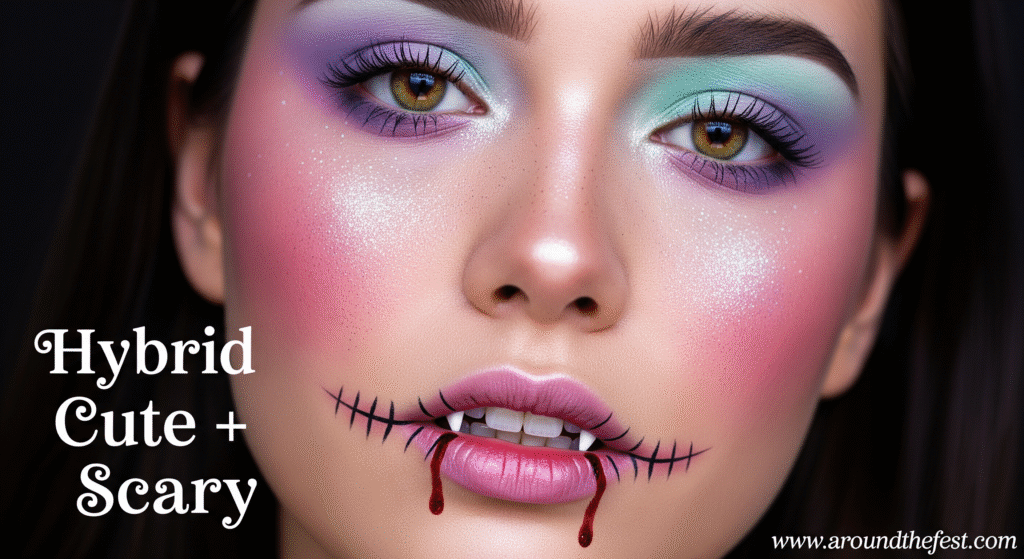
Features: Mix pastel colors with subtle spooky elements (e.g., tiny stitches, mini fangs, glitter blood)
Step-by-Step:
- Apply a pastel or neutral base.
- Add one “spooky” element like a stitched mouth or small vampire bite.
- Highlight with glitter or shimmer to maintain cute vibe.
- Optional: pair with pastel accessories or props.
DIY Tip: Use face paint pens for fine spooky details without overwhelming cuteness.
Pro Advice: Focus on balance—the goal is playful, not frightening.
Tips for Cute SFX Makeup
- Use hypoallergenic products to avoid irritation, especially for kids.
- Apply glitter over a cream base for better adhesion.
- Stickers, gems, and pre-made props can enhance creativity without complex painting.
- Layer colors gradually for soft, magical transitions.
- Perfect for photos and social media, combine pastel highlights with props for extra flair.
Optional Add-Ons Across All Cute Looks
- Temporary Tattoos or Stickers: stars, moons, candy, or tiny cute monsters
- Hair Accessories: pastel wigs, clips, or ribbons
- Props: lollipops, fairy wands, mini crowns, shells
- Face Gems & Rhinestones: applied with cosmetic adhesive along brows, cheeks, or temples
DIY & Budget-Friendly Cute SFX Tips
Homemade Glitter Glue: Mix Vaseline + cosmetic glitter for safe sparkle.
- Food-Based Colors: Beet juice, cocoa powder, or yogurt can be used as temporary color.
- Fast and cheap: paper horns, pearl strings, and feather details elevate any look in minutes.
- Minimal Tools: Use fingers or makeup sponges instead of brushes if needed.
Pro Advice for All Cute & Creative Looks
- Prep skin: moisturize and use a light primer.
- Blend colors gently for smooth pastel transitions.
- Use setting spray or powder to hold glitter and cream paints.
- Highlight key features for photos: eyes, cheeks, lips.
Encourage creativity—cute SFX is all about playful experimentation.
Beginner & Easy-to-Try Halloween SFX Looks-Halloween Special Effect Makeup
Not everyone has hours to spend on complex SFX makeup. For beginners or anyone short on time, 2025 offers simple, creative, and approachable SFX looks that still make a big impression. These looks are perfect for first-timers, kids, or casual Halloween parties, and require minimal products and skills.
1. Minimalist Skeleton (Half-Face)
Features: Half-face skeleton, black-and-white contouring, simple teeth line
Step-by-Step:
- Apply a light foundation or face powder on the entire face.
- With black eyeliner or face paint, outline the skull on half your face.
- Fill in hollow eye socket, nose cavity, and teeth lines with black.
- Optional: add thin white highlights along cheekbone and jaw for depth.
DIY Tip: A thin makeup brush or pencil works if you don’t have face paint.
Pro Advice: Practice the teeth spacing on paper first to nail proportions.
2. Classic Cat or Witchy Smokey Eye
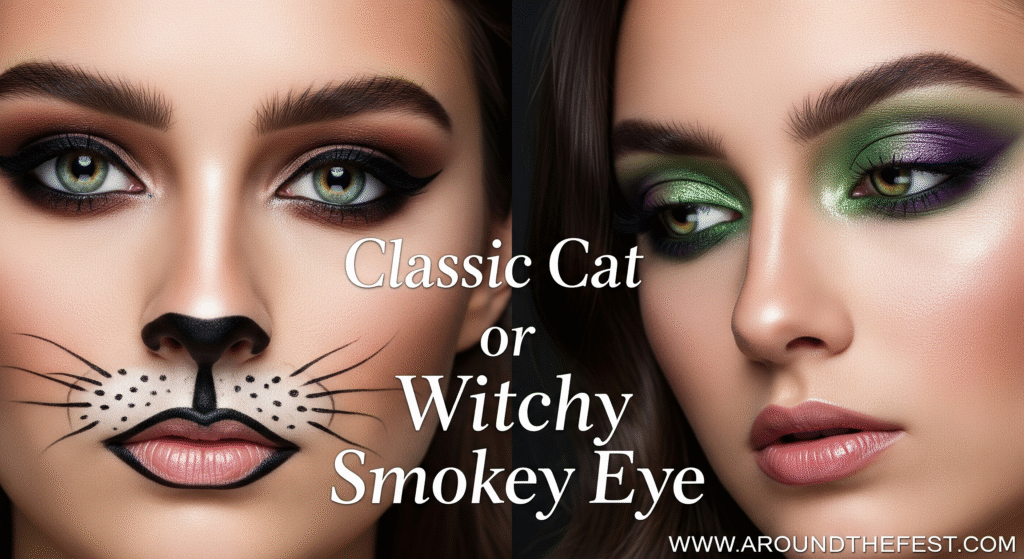
Features: Smokey eyes, cat-eye flick, optional nose/whiskers (cat) or green/purple tones (witchy)
Step-by-Step:
- Apply foundation and a light eyeshadow base.
- Blend deeper shadow in the crease and outer corner for a smokey effect.
- Draw a winged liner.
Optional (Cat): add a black nose tip and whiskers.
Optional (Witchy): layer green/purple on lids and lower lash line; add a touch of shimmer.
DIY Tip: Pencil liner is easier than liquid for beginners.
Pro Advice: Add a hat or wig—small props boost the illusion with zero extra makeup work.
3. Vampire Bite Accent / Glowing Neon Lines
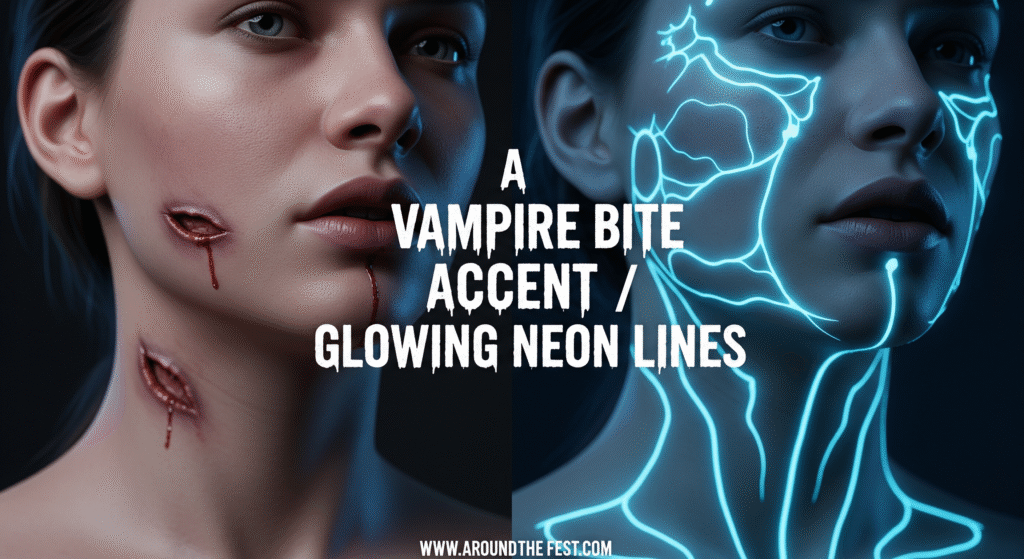
Variant A: Vampire Bite Accent
Features: Two small bite marks on neck or wrist
Step-by-Step:
- Apply a pale base (optional).
- Dot two small punctures with red lipstick or face paint.
- Shade around them with purple/brown for bruising; add a tiny blood drip.
DIY Tip: Blend shading with a cotton swab for a realistic bruise halo.
Pro Advice: Quick, minimal, and reads instantly on camera.
Variant B: Glowing Neon Lines
Features: UV/neon “energy” veins or geometric lines (no bite required)
Step-by-Step:
- On clean skin, sketch thin lines from temples, cheekbones, or jaw using white pencil.
- Trace over with UV/neon eyeliner or face paint.
- Add small breaks and forks so lines look organic or techno.
- Optional: set with translucent powder; shines under blacklight.
DIY Tip: Mix a drop of moisturizer with neon pigment for smoother application.
Pro Advice: Keep lines few and strategic—less is cleaner (and more beginner-proof).
4. Simple Zombie Bite / Ghostly Pale Face
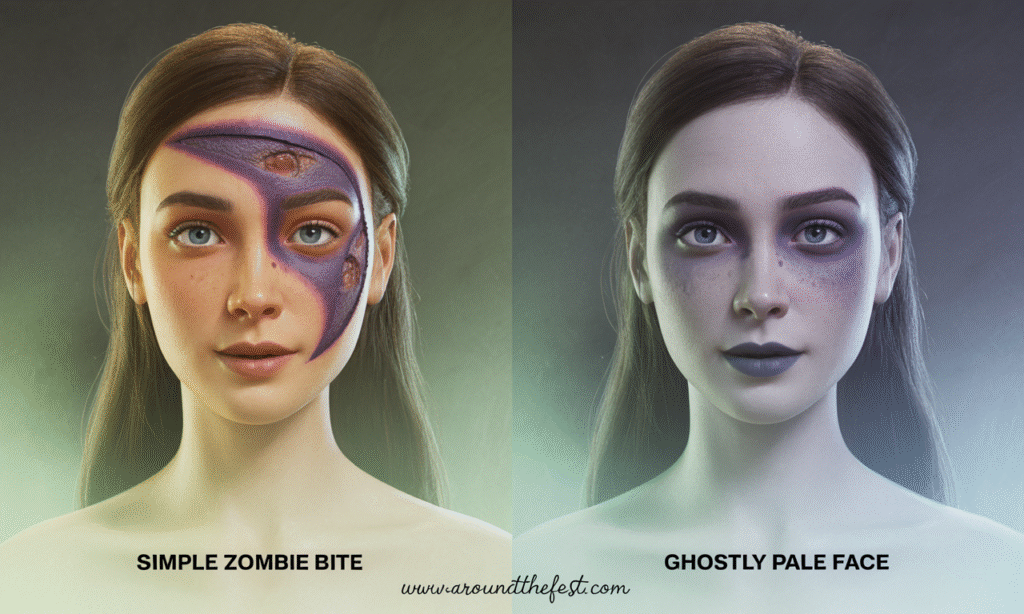
Variant A: Simple Zombie Bite
Features: Single bite or scratch, light bruising
Step-by-Step:
- Pale down the skin with light foundation or powder.
- Sketch a crescent bite or short scratch in red.
- Tap purple, green, and brown tones around it to mimic bruising.
- Add a touch of dried-blood shade for realism.
DIY Tip: Cocoa powder + a touch of water makes a great bruise wash.
Pro Advice: Imperfect blending looks more authentic—don’t overwork it.
Variant B: Ghostly Pale Face
Features: Desaturated skin, hollow eyes, soft lips
Step-by-Step:
- Even pale base over face and neck.
- Shade eye sockets with gray; lightly contour cheek hollows.
- Dab a muted lip color or translucent balm.
DIY Tip: A cool-toned eyeshadow palette can do all the shading.
Pro Advice: Works with any outfit; add a vintage scarf or lace for “instant apparition.”
5. Ultra-Fast Beginner Look (2-Minute Fix)
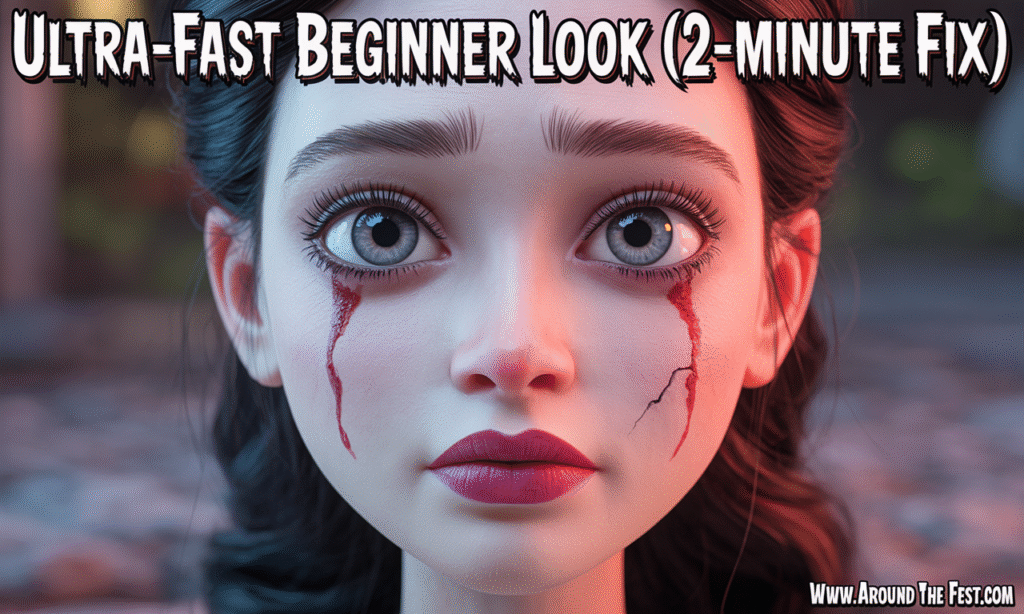
Features: High impact, almost no tools
Step-by-Step:
- Draw bloody tears under each eye or a single facial crack with black eyeliner.
- Smudge lightly with your fingertip.
- Add a dab of red lipstick or fake blood at the lowest point.
DIY Tip: Red food coloring + water = convincing tear drops (avoid near contacts).
Pro Advice: Perfect for last-minute invites or quick TikToks.
Kid-Friendly Beginner Look (Safe & Fun)
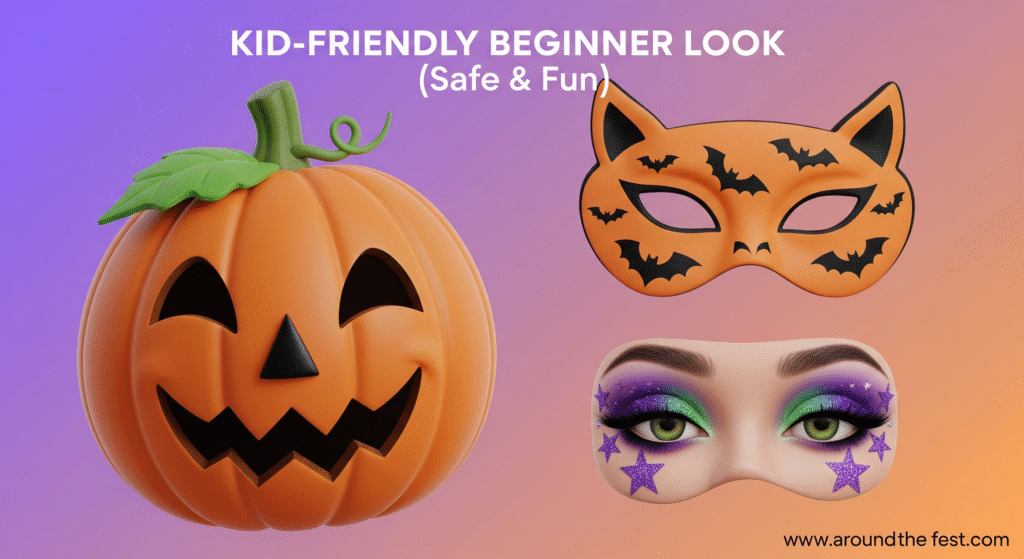
Features: Bright colors, cute motifs, no heavy products
Options & Steps:
- Pumpkin Face: Orange base → black triangle nose & jagged smile → green leaf accent at hairline.
- Bat Mask: Outline small bats across cheeks/forehead with black eyeliner; fill or leave graphic.
- Starry Witch: Sweep purple/green on lids → stick on glitter stars around eyes.
DIY Tip: Use hypoallergenic, child-safe face paints; avoid latex/strong adhesives.
Pro Advice: Keep designs bold and simple; remove with gentle cleanser or micellar water.
Tips for Beginners
- Limit to 3–5 products (foundation, 1–2 shadows, eyeliner, optional fake blood).
- Use a mirror at eye level for symmetry.
- Practice key features (teeth lines, winged liner, bite marks) on your hand first.
- Blend edges lightly and layer color slowly.
- Keep wipes/cotton swabs handy for quick fixes.
Optional: add props (hats, wigs, masks) to elevate simple makeup instantly.
Safety: Patch-test new products; choose hypoallergenic options for sensitive skin.
DIY & Budget-Friendly Alternatives

- Fake Blood: Corn syrup + red food coloring (+ cocoa for darker coagulated tone).
- Simple Wounds: Tissue + school glue or petroleum jelly to raise skin; paint over.
- Minimal Brushes: Fingers and cotton swabs can do most tasks.
- Temporary Tattoos/Stickers: Stars, hearts, scars for instant SFX—great for kids.
Pro Advice for Beginner Looks
- Focus on one main feature per look for maximum payoff.
- Don’t overcomplicate—less is more (especially under party lighting).
- Prep skin and set with translucent powder or setting spray for all-night wear.
- Shoot under soft or natural light; angle slightly down for flattering selfies.
You may also read-https://aroundthefest.com/best-halloween-desserts-2025-spooky-treats-for-kids-parties/
Quick & Last-Minute Halloween SFX Ideas-Halloween Special Effect Makeup
1. Spider Web Eyeliner
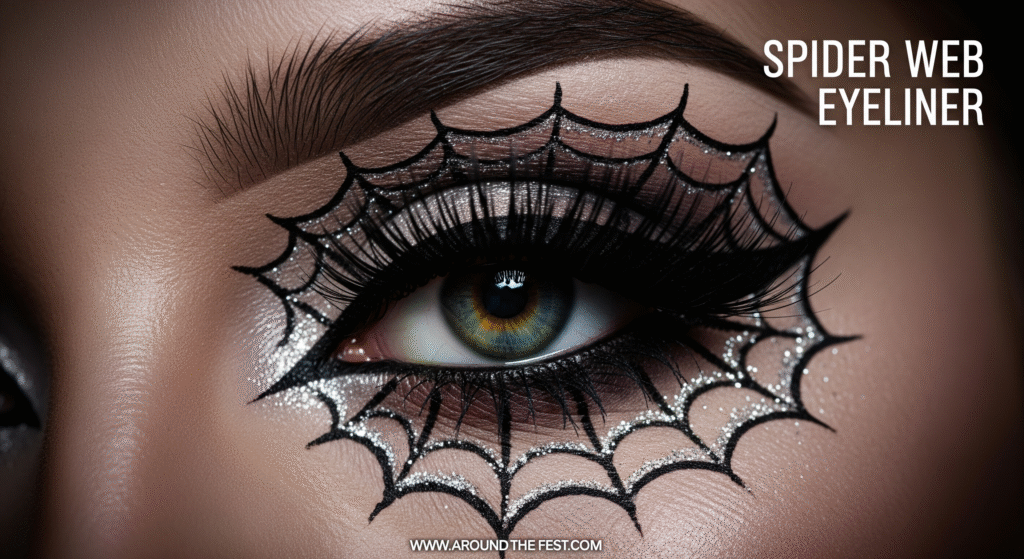
Features: Black web extending from eyeliner or under the eyes.
Step-by-Step:
- Apply your usual eyeliner with a wing.
- Extend 3–4 thin lines outward from the corner of your eye.
- Connect with small arcs to form a web shape.
- Optional: Add rhinestones or silver glitter along the lines for shimmer.
DIY Tip: Use a black gel pen eyeliner for clean lines if you don’t own face paint.
Pro Advice: Works best with bold lashes or mascara for a sharp contrast.
2. Bloody Tears
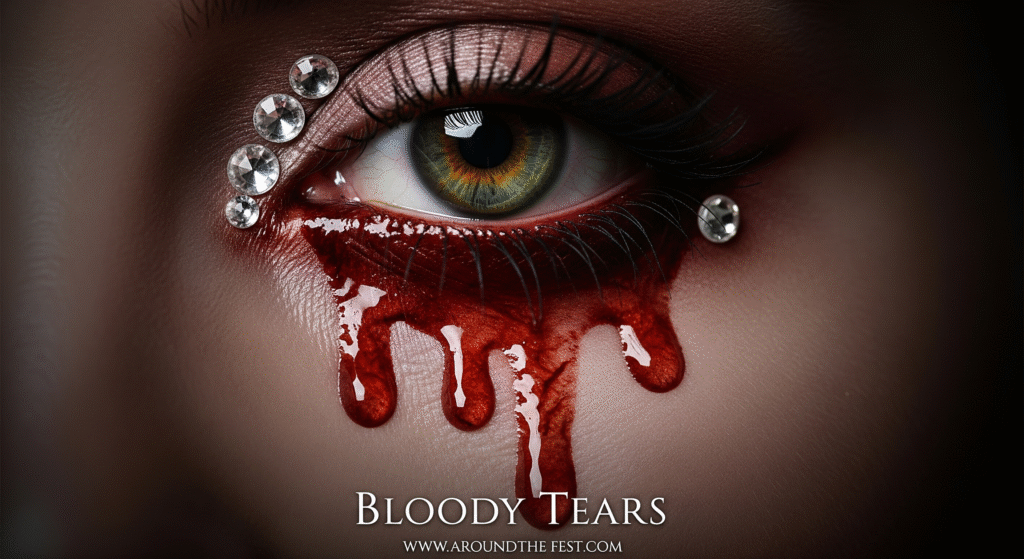
Features: Dripping blood effect under the eyes.
Step-by-Step:
- Draw a vertical red line under each eye using face paint, lipstick, or food coloring.
- Thicken the bottom to look like a natural drip.
- (Optional) Shade with dark red or brown for a congealed, realistic effect.
DIY Tip: Mix corn syrup + red food coloring for instant, glossy, real-looking blood.
Pro Advice: For dramatic selfies, tilt your head slightly down so the drips look like they’re falling naturally.
Creative Variations
- Crystal Tears: Outline the blood drips with tiny rhinestones for a glam-gore mix.
- Rainbow Tears: Use red fading into purple and black for an artistic gothic vibe.
- Spider-Blood Tears: End each drip with a tiny drawn spider for an eerie twist.
3. Pop Art Comic Look
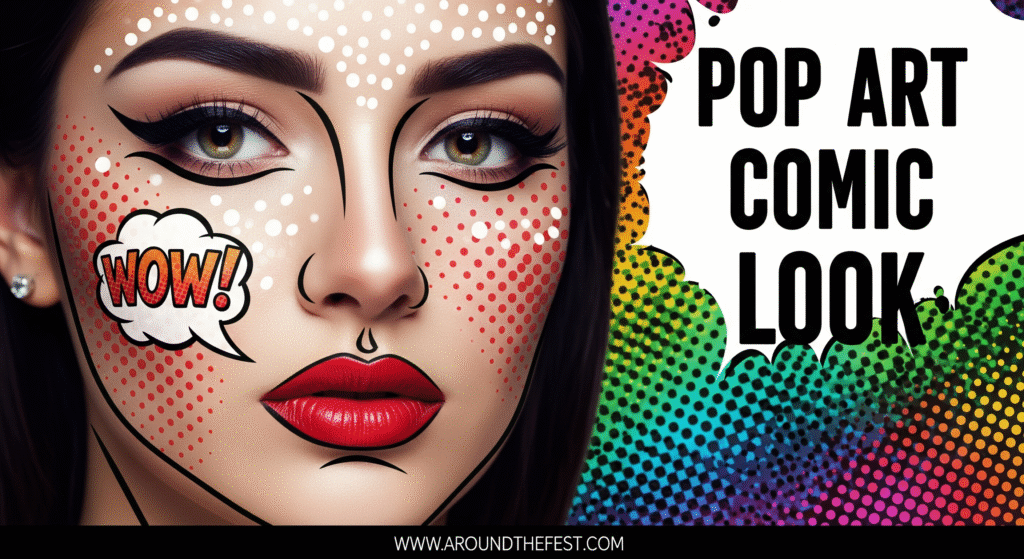
Features: Comic book–style makeup with bold outlines, exaggerated colors, and signature dotted textures.
Step-by-Step:
- Outline facial features like the nose, jawline, and cheekbones using a precise black eyeliner.
- Fill lips with a bright primary shade—classic red, bold pink, or striking blue.
- Add dotted highlights across cheeks and forehead using a small brush, cotton swab, or the back of a pencil dipped in white paint.
- (Optional) Draw a fun speech bubble or action word (“WOW!” / “BOOM!”) on the cheek or forehead for comic-book drama.
DIY Tip: Colored eyeliners, kids’ face paints, or even liquid lipstick can double as bold comic shades.
Pro Advice: Stick to 2–3 primary colors for maximum authenticity and contrast.
Creative Variations
- Roy Lichtenstein Style: Add teardrops outlined in black for an instant vintage pop art reference.
- Neon Pop Art: Replace primary shades with neon brights for a futuristic, comic-cyber vibe.
- Half-Face Split: Keep one side of the face realistic makeup and the other in full comic-book art for dramatic selfies.
4. Cute Monster Accent
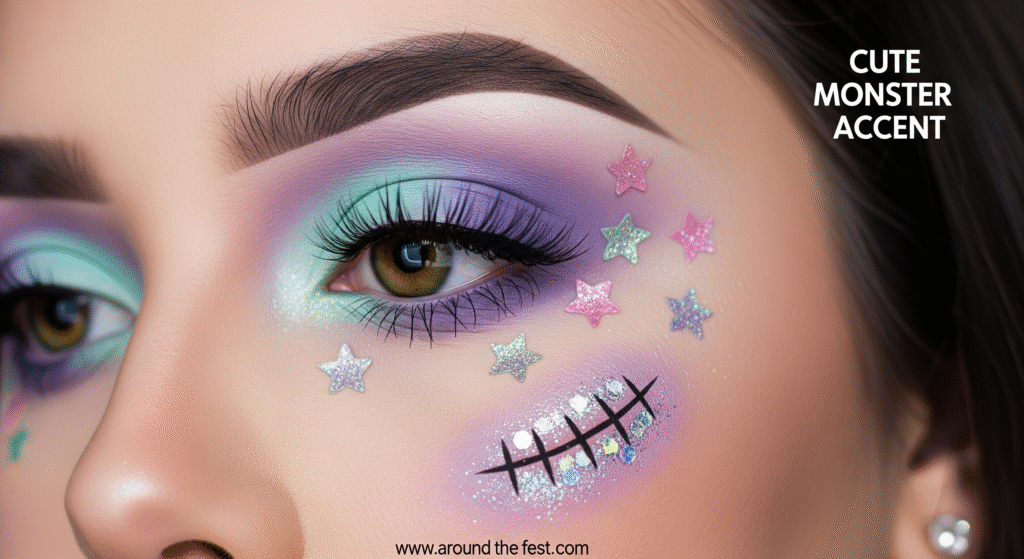
Features: Playful monster vibes using pastel colors mixed with tiny, whimsical gore accents.
Step-by-Step:
- Apply a pastel base eyeshadow (pink, lilac, mint, or baby blue) over lids and upper cheeks.
- Draw a small stitched scar, cartoon eyeball, or bite mark on your cheek or neck using eyeliner or face paint.
- Add glitter, rhinestones, or star stickers around the scar to soften the look and keep it playful.
DIY Tip: Use stickers, washi tape cutouts, or temporary tattoos for monster patches if you’re short on time.
Pro Advice: Keep gore minimal and symbolic (just one scar or a single eye) so the overall vibe stays cute and approachable.
Creative Variations
- Kawaii Frankenstein: Add pastel stitches across the forehead and tiny heart-shaped scars.
- Cartoon Cyclops:Draw one big pastel-colored eye on the forehead for a cute monster parody.
- Starry Gore-Core: Replace fake blood with pink or glitter tears for a pastel-horror twist.
5. Stickers & Temporary Tattoos
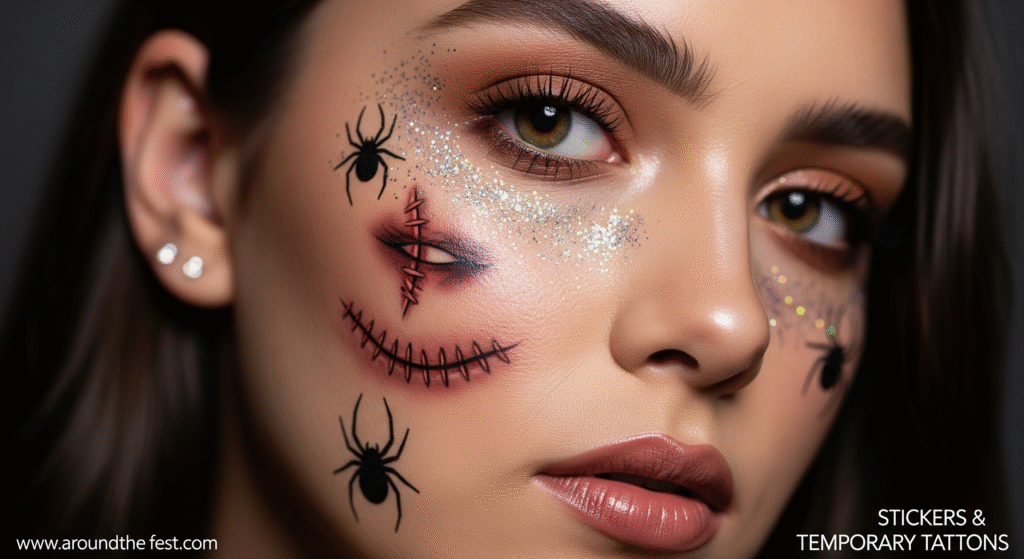
Features: No makeup brushes, no mess — just peel, stick, and you’ve got instant SFX.
Step-by-Step:
- Apply Halloween-themed temporary tattoos (stitches, scars, cobwebs, cracks) to clean, dry skin.
- Blend the tattoo edges with a light layer of foundation or concealer for a realistic finish.
- Optional: Add glitter, rhinestones, or eyeliner doodles around the tattoos to personalize the look.
DIY Tip: If tattoos aren’t handy, Halloween stickers (pumpkins, spiders, skulls) work as a quick swap — just stick and go.
Pro Advice: Perfect for kids, busy parents, or total beginners. Add a wig, headband, or themed accessory to instantly upgrade the look.
Creative Variations
- Spider Queen: Use spider-web tattoos around the eyes, add glitter at the corners.
- Broken Doll: Place crack-pattern tattoos on the cheeks and forehead for a porcelain-doll vibe.
- Zombie Patchwork: Layer stitches and scar tattoos across arms or neck for quick undead styling.
6. Neon Tribal Lines
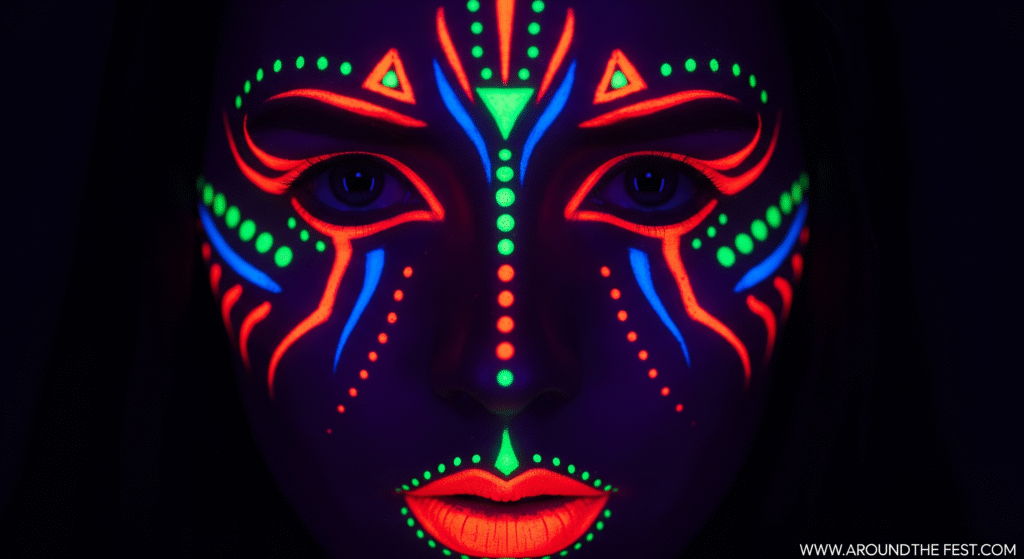
Features: Striking neon face patterns that pop under party lights or glow brilliantly under UV blacklight.
Step-by-Step:
- Start by sketching clean, simple tribal-inspired lines across the forehead, cheeks, and jaw using a white eyeliner as a guide.
- Layer over with neon face paint or colored eyeliner in shades like hot pink, electric green, or neon blue.
- Add dots, triangles, or zig-zags between the lines for extra futuristic energy.
- Optional: Pair with glowing accessories like neon chokers, glow sticks, or UV-reactive hair spray.
DIY Tip: No neon paint? Use bright-colored eyeliners and shine a ring light, flashlight, or LED lamp on your face to boost vibrancy.
Pro Advice: Keep the lines symmetrical for maximum impact in photos and TikTok clips.
Creative Variations
- Cyber Glow: Add metallic silver accents or rhinestones between neon lines for a cyberpunk vibe.
- Festival Fusion: Mix neon tribal patterns with glitter freckles for a rave-ready Halloween look.
- Alien Edge: Draw elongated neon lines over the brows and chin to mimic extraterrestrial markings.
7. Fake Scar or Scratch Lines
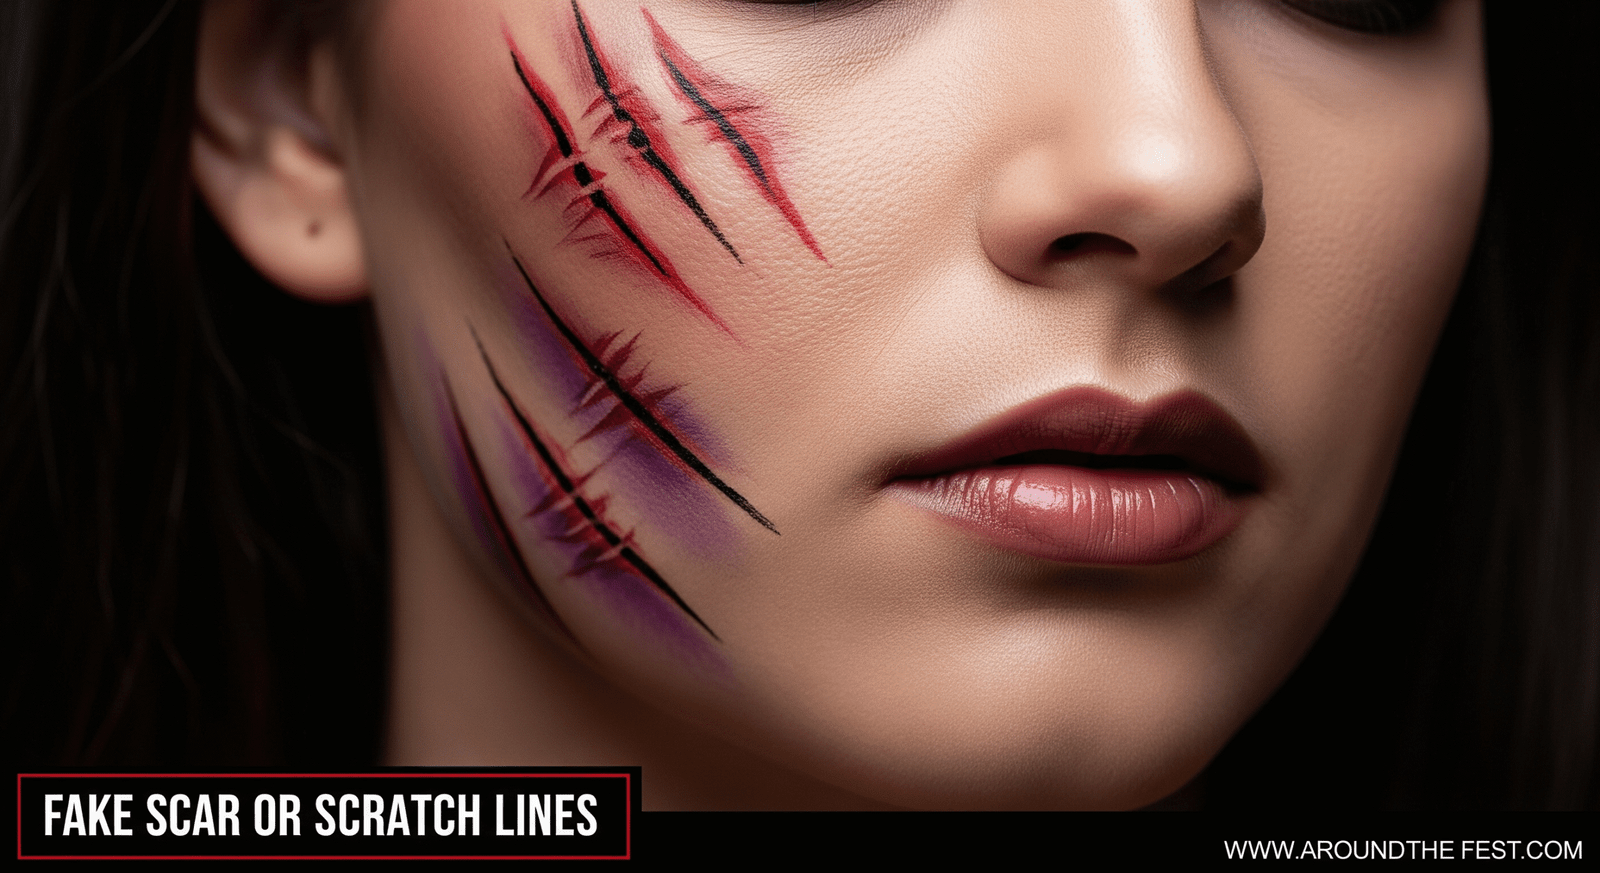
Features: Quick, jagged scratches that add instant realism without heavy products.
Step-by-Step:
- Use black eyeliner, red lipstick, or eyeshadow to sketch thin, uneven scratch lines across cheeks, neck, or arms.
- Smudge lightly with your fingertip or cotton swab to mimic irritation.
- Optional: Add purple or blue shading around edges for a bruised effect.
- For extra gore, dab a touch of dark red or brown in the center for dried blood.
DIY Tip: Cotton swabs work best for softening edges, making scratches look “healed” rather than freshly drawn.
Pro Advice: This versatile look fits everything from vampire attacks to zombie bites or even a “battle-ready” warrior vibe.
Creative Variations
- Claw Marks: Extend 3–4 parallel scratches across one cheek for a werewolf-style effect.
- Cross-Hatched Cuts: Layer smaller scratches in random directions to mimic messy scuffles.
- Bloody Battle Look: Combine with smudged dirt (brown eyeshadow + cocoa powder) for a gritty, survivor aesthetic.
8. Mini Monster Eyes

Features: Playful, cartoonish mini eyes painted on the skin — cute yet slightly creepy.
Step-by-Step:
- Use black eyeliner or face paint to draw small oval or round “eyes” on the forehead, cheeks, or temples.
- Fill in the pupils with black, then add a small white dot highlight for a glossy effect.
- Optional: Multiply the eyes for a “many-eyed monster” vibe that’s quirky instead of scary.
DIY Tip: Don’t want to paint? Use eye stickers or googly eyes with safe skin adhesive for a kid-friendly option.
Pro Advice: Great for TikToks, Reels, or selfies — the effect pops on camera, especially with bold pastel or neon backgrounds.
Creative Variations
- Cute Alien: Add three small eyes on the forehead in a triangle pattern.
- Monster Cluster: Fill one cheek with 5–6 mini eyes of different sizes for an exaggerated effect.
- Glam Monster: Surround painted eyes with glitter or rhinestones for a magical vibe.
9. Glitter Blood or Candy Drips
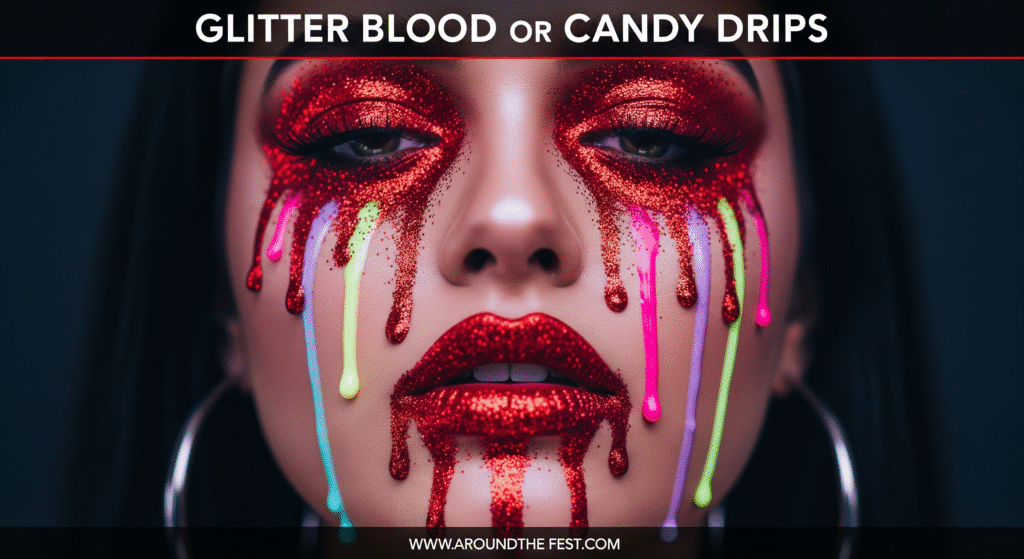
Features: Sparkling blood or sweet drips for dramatic effect.
Step-by-Step:
- Mix red face paint with cosmetic glitter.
- Apply as small drips under eyes, on lips, or along jawline.
- Optional: Use toothpick for fine, precise drips.
DIY Tip: Non-toxic cosmetic glitter ensures safety around eyes.
Pro Advice: Quick, safe, and photogenic for parties.
Creative Variations
- Candy Drips: Swap red for pink, purple, or neon slime colors to mimic melting candy or icing.
- Vampire Glam: Add rhinestones or dark lip liner around glitter blood for luxe undead vibes.
- Rainbow Drips: Blend multiple glitter shades (like cotton candy pink + teal) for a dreamy monster look.
10. Single Accent Feature
Features: Bold single element like a bleeding eye, stitched lip, or mini horn outline.
Step-by-Step:
- Choose one main feature.
- Draw or paint in red, black, or white for maximum contrast.
- Optional: Add tiny shading or glitter to enhance realism.
DIY Tip: Keeps makeup simple but eye-catching.
Pro Advice: Less is more—focus on one feature for impact.
Creative Variations
- Bleeding Eye: Use red gloss or corn syrup mix for a wet-look drip.
- Stitched Lip: Black crisscross stitches with white highlights for 3D effect.
- Mini Horns: Outline devil horns with eyeliner and fill with neon or glitter for a fun twist.
- Celestial Accent: One bold moon or star near the eye paired with shimmer.
11. Temporary Hair Streaks / Chalk
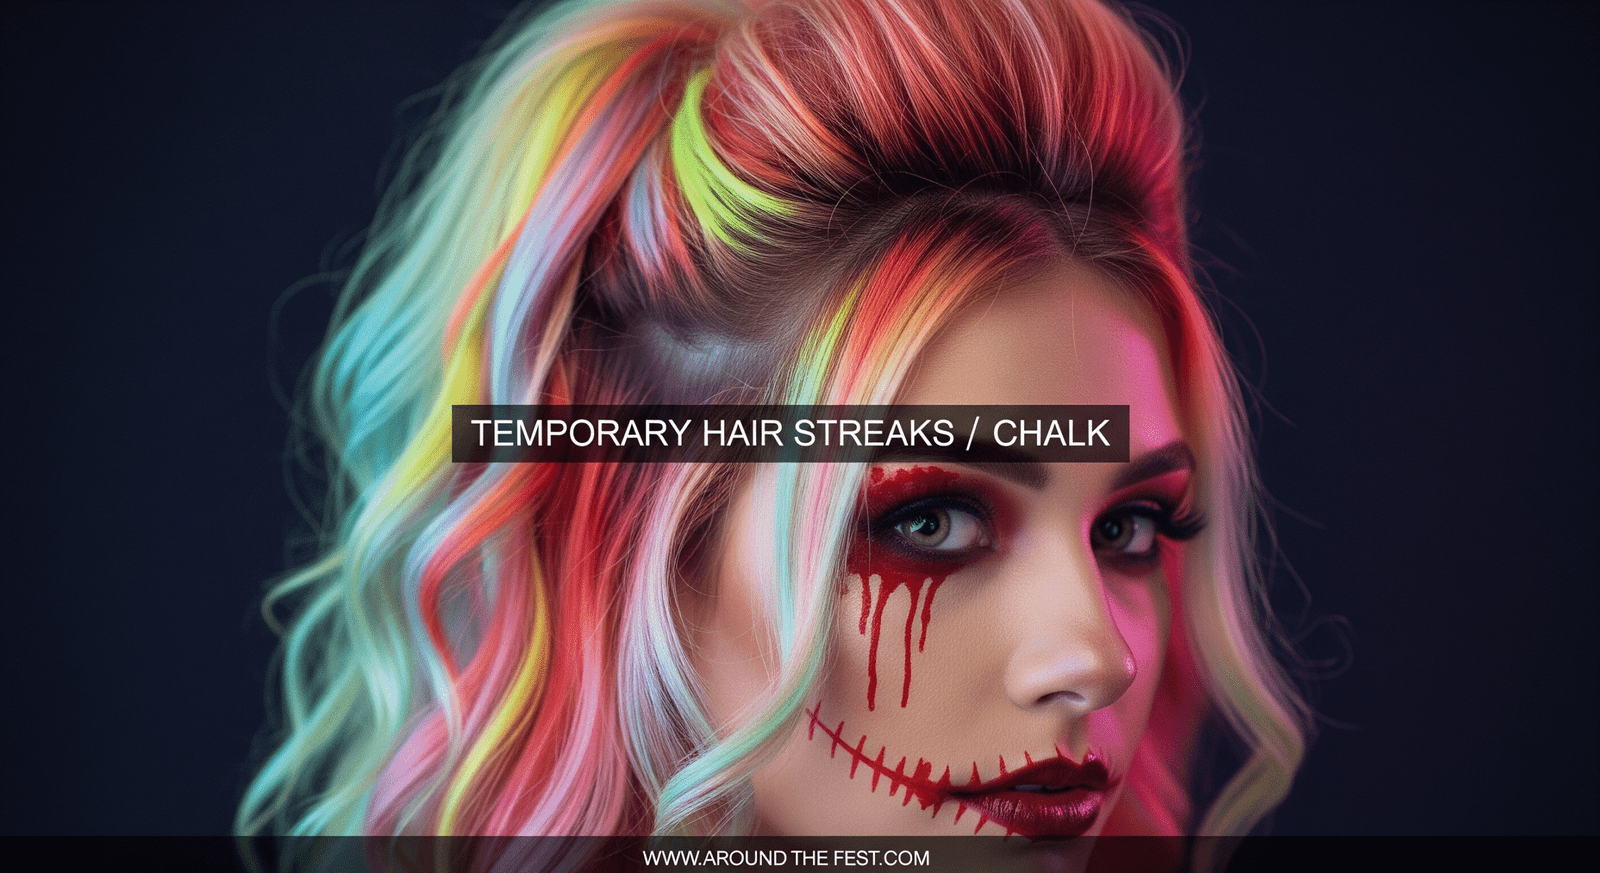
Features: Quick streaks in neon, pastel, or blood-red tones for instant character transformation.
Step-by-Step:
- Select a hair chalk, spray, or washable dye in your chosen color.
- Section out small strands of hair.
- Apply color from mid-length to tips (or roots for bold streaks).
- Optional: Tease, curl, or braid colored strands for extra drama.
DIY Tip: Coordinate hair streaks with your makeup theme (neon for glow looks, red for vampire/zombie, pastel for cute horror).
Pro Advice: Perfect for kids and adults — easy to apply, washes out with shampoo, and safe for party or school events.
Creative Variations
- Neon Glow Streaks: Pair with UV-makeup for a blacklight party.
- Pastel Candy Streaks: Match with fairy, unicorn, or pop-art looks.
- Blood-Red Tips: Works with vampires, zombies, or gothic styles.
- Split Streaks: Do half one color, half another for quirky contrast.
12. Stencil-Based Makeup
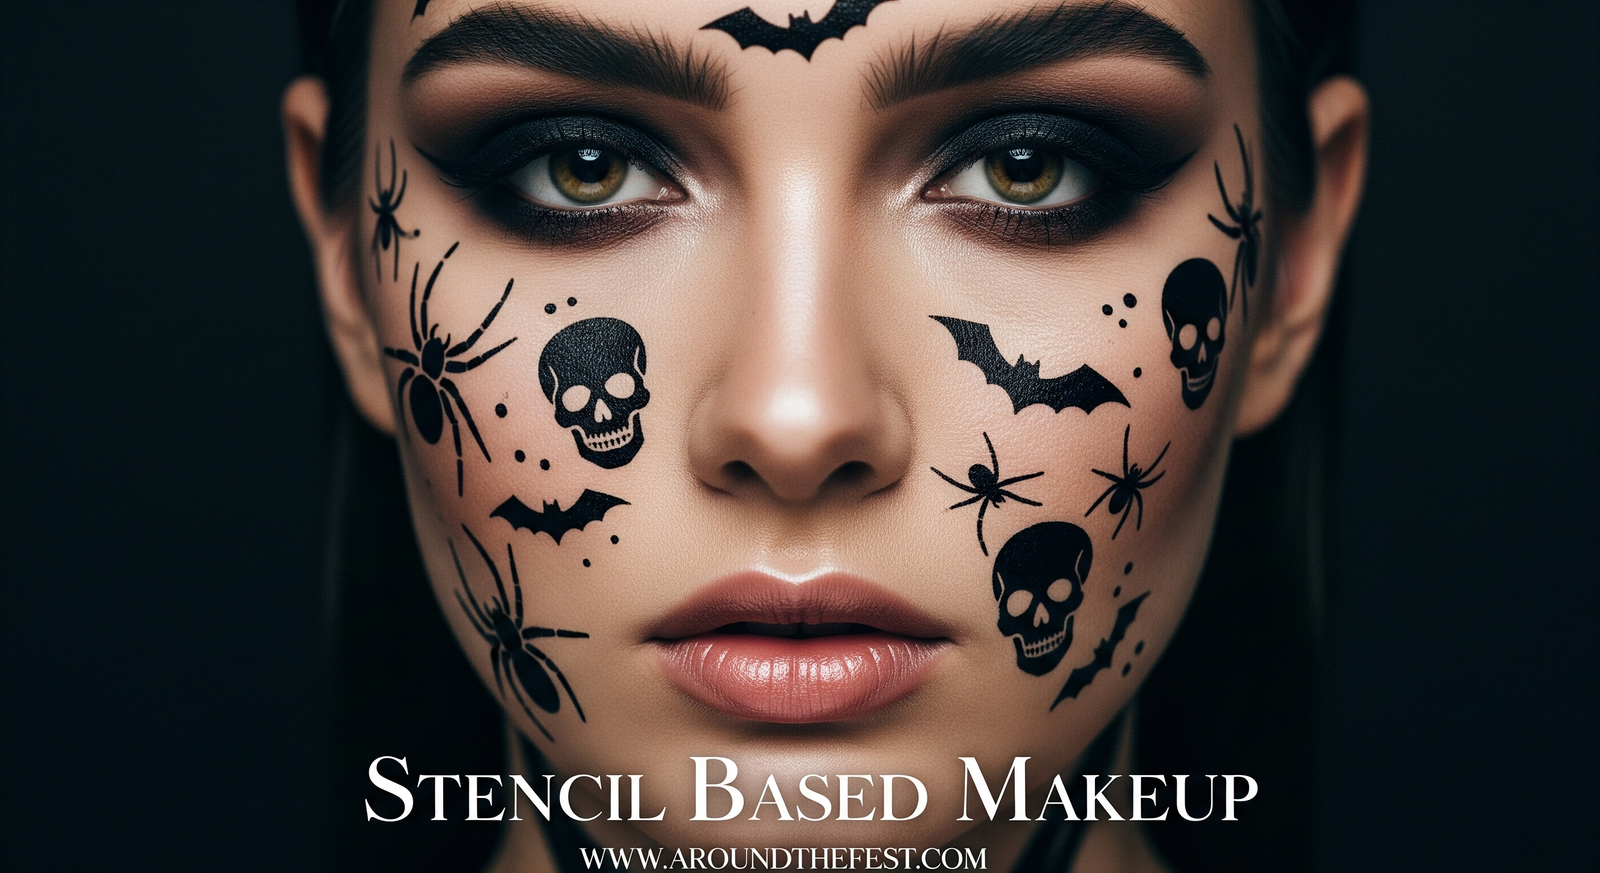
Features: Use stencils (spiders, bats, skulls) for instant SFX.
Step-by-Step:
- Place stencil on clean skin.
- Dab eyeshadow, paint, or eyeliner over it.
- Remove stencil and touch up edges.
DIY Tip: Repeat pattern on cheeks, forehead, or neck for symmetry.
Pro Advice: Great for beginners and fast application.
13. Mini Thematic Combos
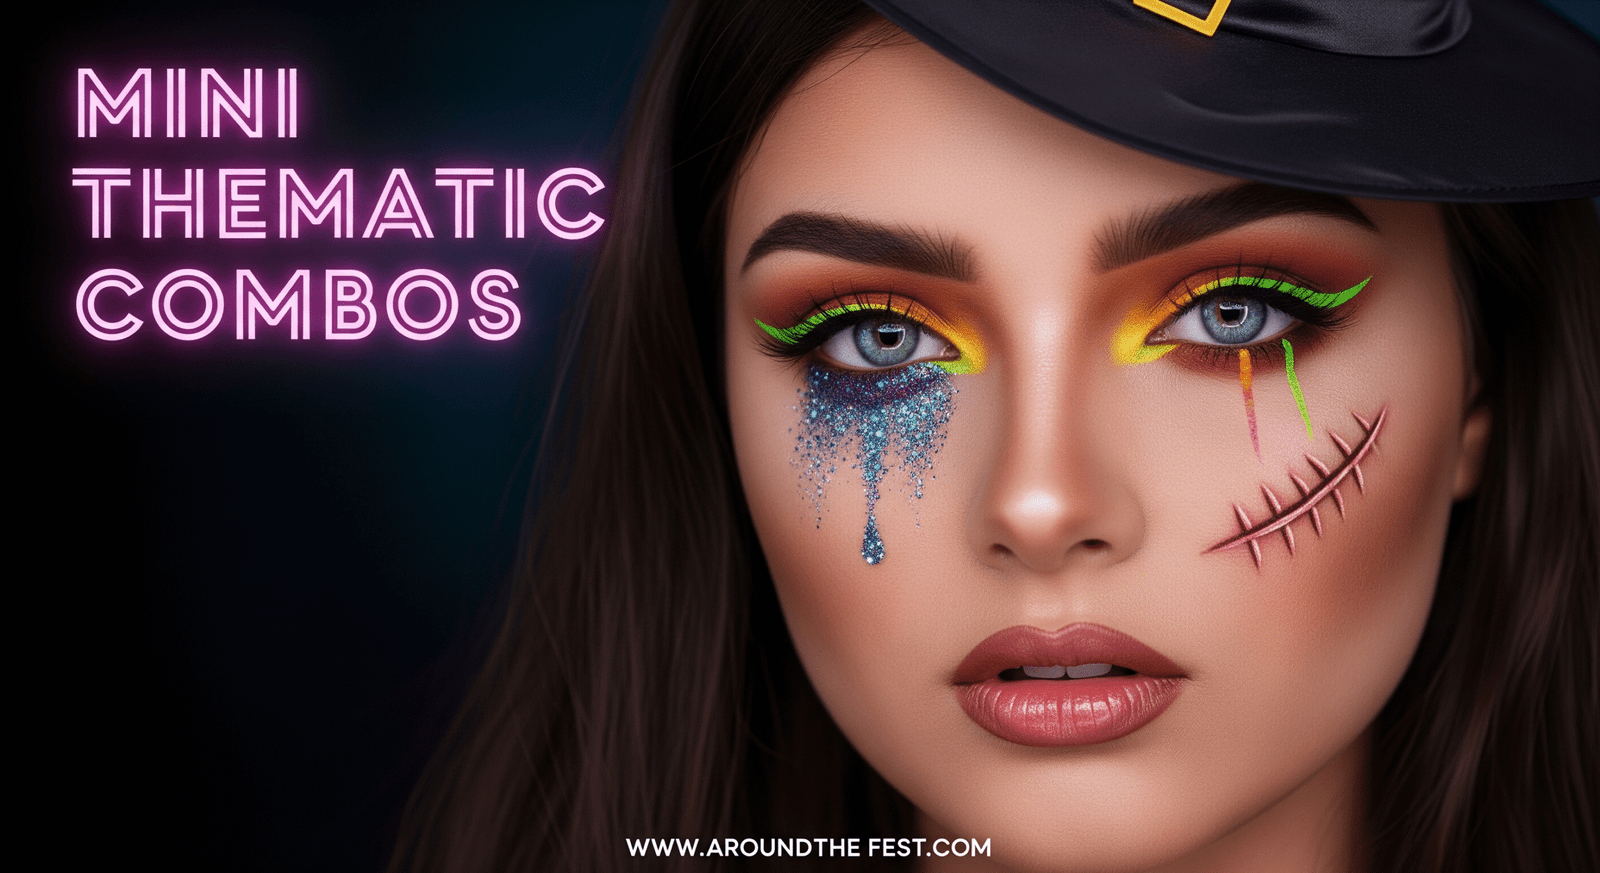
Features: Mix two or more quick ideas for a hybrid look.
Step-by-Step:
- Choose 2–3 small SFX elements (e.g., glitter tears + temporary tattoo scar + neon eyeliner streak).
- Apply each element strategically across the face.
Optional: Add props like wigs, hats, or headbands to complete the theme.
DIY Tip: Modular approach lets you customize to skill level and available materials.
Pro Advice: Combos give a unique, creative look without requiring full-face painting
Tips for Last-Minute Looks
- Focus on one or two striking features rather than full-face detail.
- Keep a mini SFX kit ready: black eyeliner, red lipstick, glitter, and cotton swabs.
- Use props or accessories (hats, masks, headbands) to enhance minimal makeup.
- Good lighting matters more than perfect detail for photos.
- Don’t worry about perfection — a messy or uneven effect can look scarier!
Emerging & Viral Halloween SFX Trends – 2025 Guide
Halloween 2025 is all about pushing creativity beyond classic SFX. Emerging trends combine futuristic, viral, celestial, eco-conscious, interactive, and folklore-inspired designs. These looks are perfect for social media, competitions, or anyone aiming for a bold, unforgettable Halloween transformation.
Eco-Horror & Organic Transformations
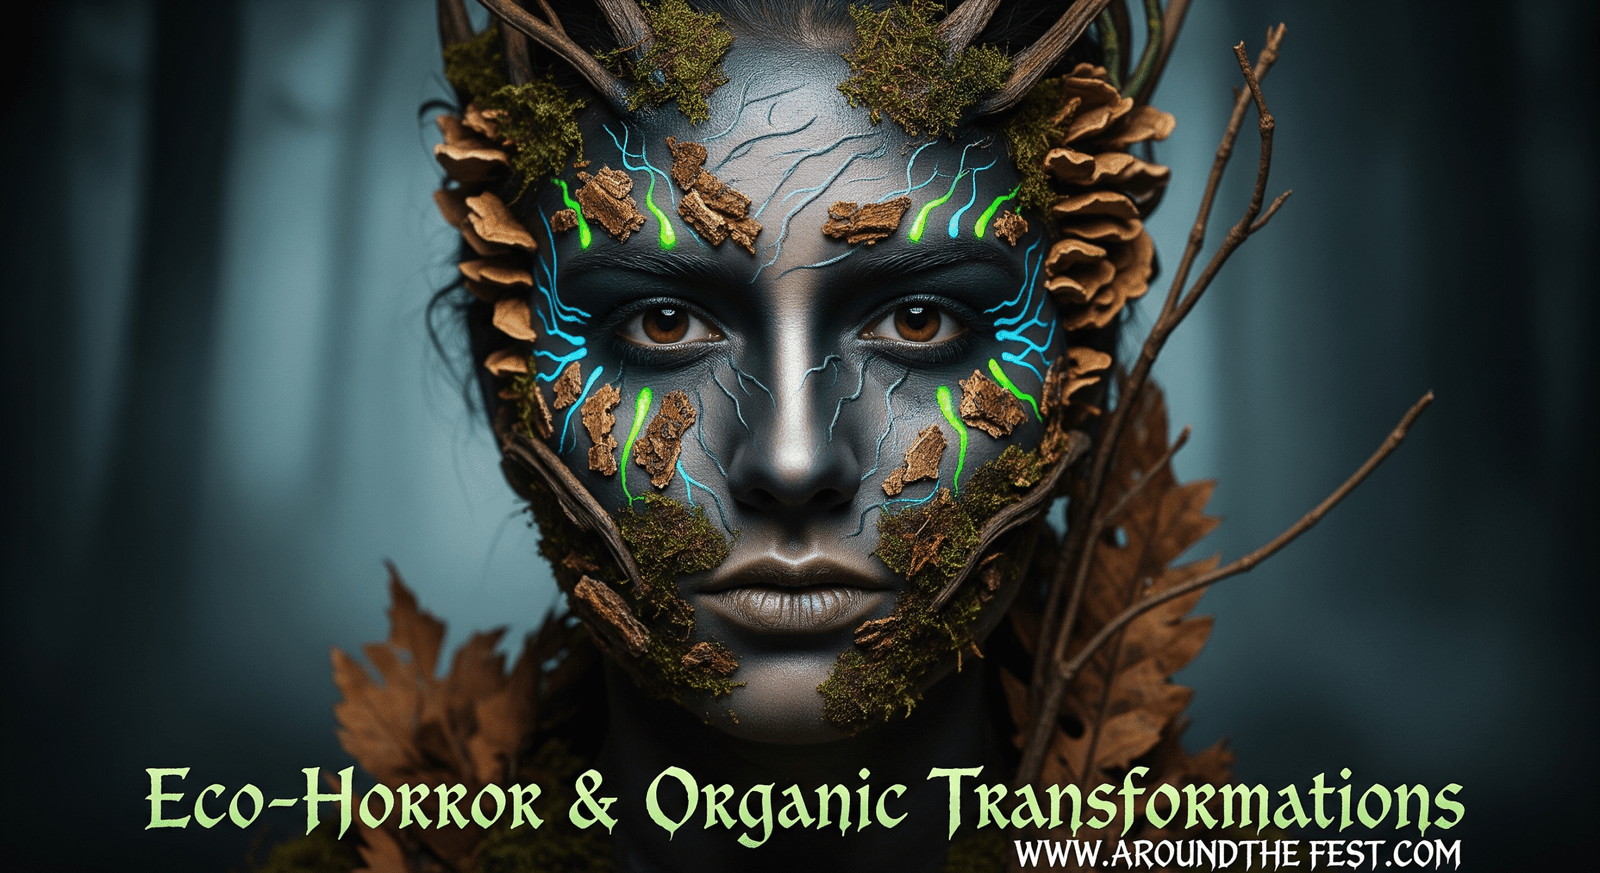
Features: Fungal growth textures, mossy patterns, rust effects, polluted water veins, bioluminescence.
Step-by-Step:
- Apply green, brown, and gray paints as a base texture.
- Build layers with sponges or crumpled tissue for 3D effects.
- Add glow-in-the-dark or neon highlights for bioluminescence.
- Optional: Incorporate small natural props like twigs or leaves.
DIY Tip: Cocoa powder or coffee grounds create realistic earthy textures.
Pro Advice: Great for eco-conscious parties or unique horror aesthetics.
Ethereal & Celestial Beings
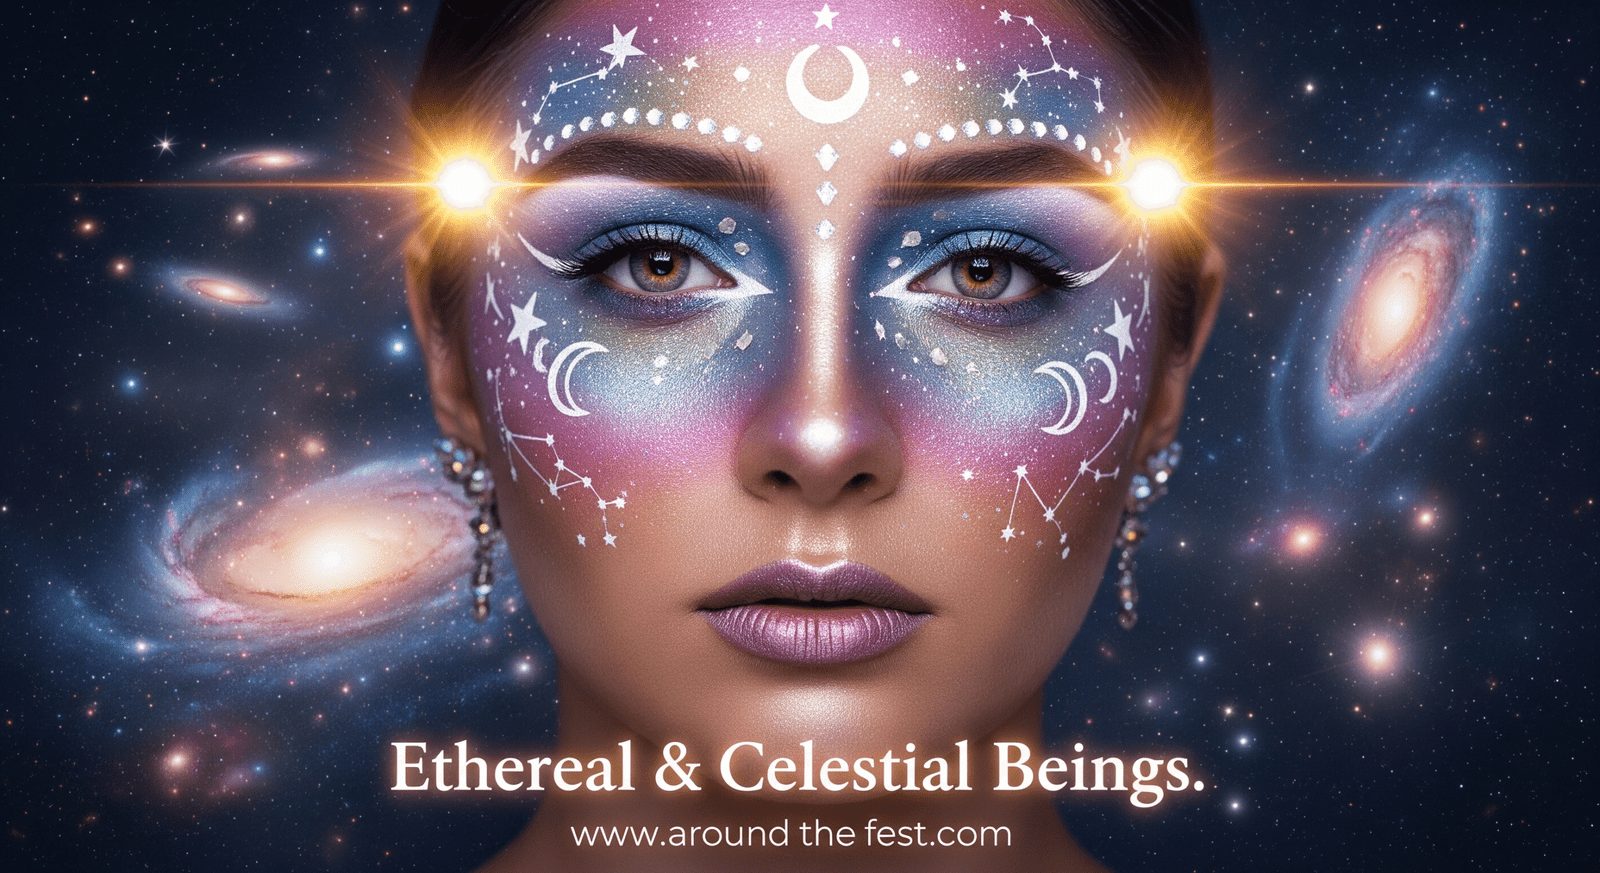
Features: Nebula skin, glittery constellations, crystal accents, solar flare highlights, ghostly auras.
Step-by-Step:
- Apply pastel, metallic, or gradient base paints.
- Use white eyeliner or paint to draw stars, moons, or constellation patterns.
- Layer glitter or cosmetic crystals for depth.
- Optional: Extend design to shoulders or arms for immersive effect.
DIY Tip: Clear gel can attach lightweight crystals safely.
Pro Advice: Blend colors smoothly to achieve seamless celestial effects.
Retro-Futurism & Vintage Horror
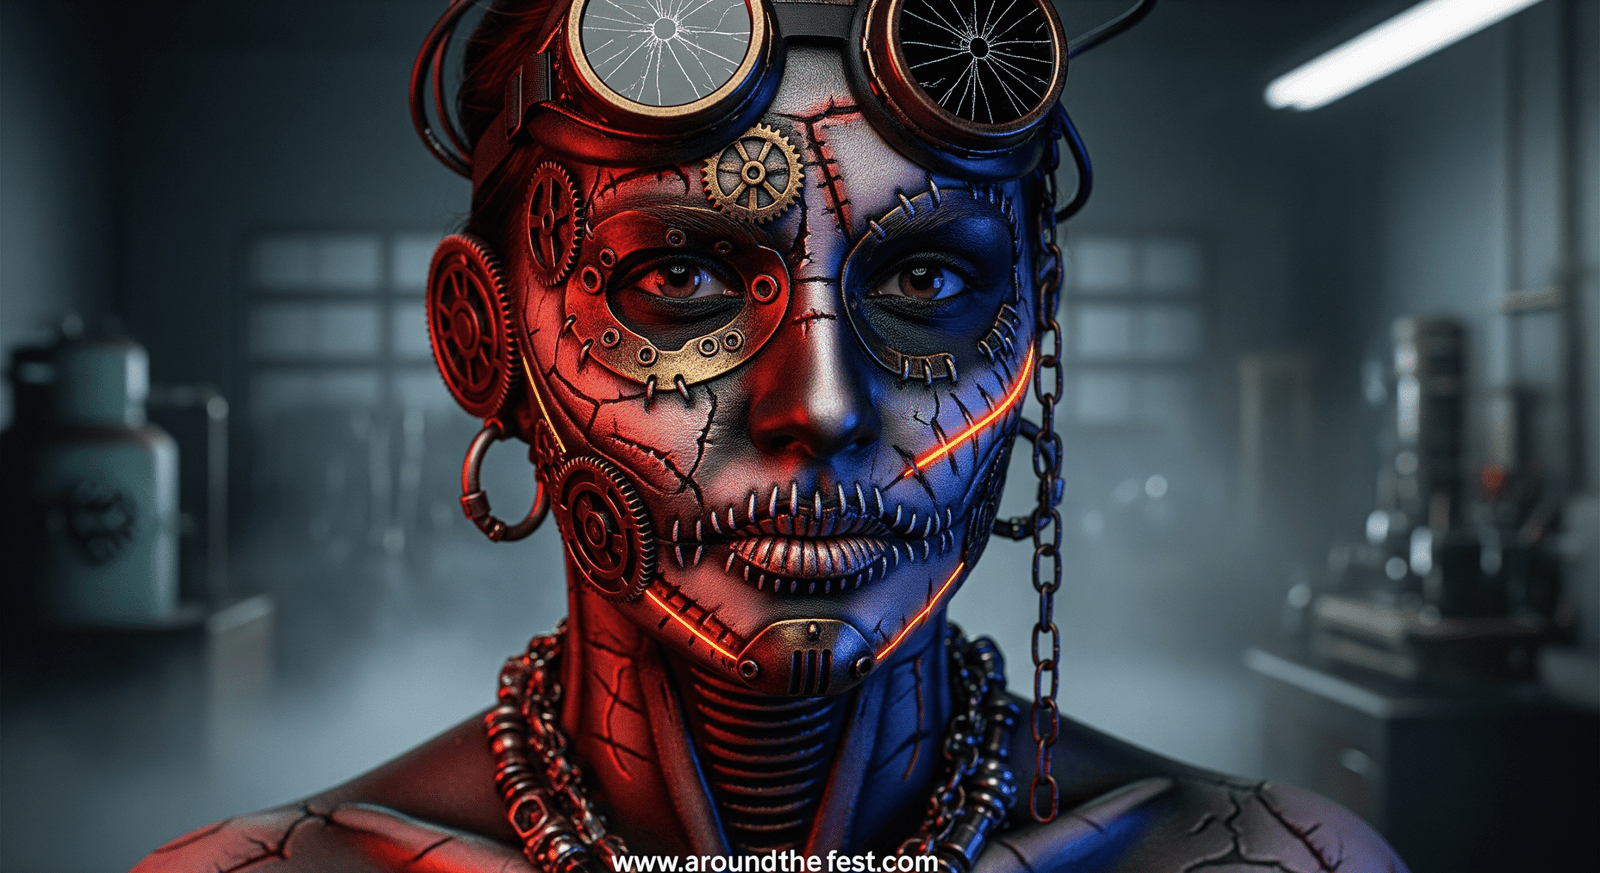
Features: 1920s cyborgs, steampunk monsters, 80s practical effects revival, reimagined classic monsters.
Step-by-Step:
- Select era inspiration (steampunk, 80s horror, Victorian).
- Apply metallic, bronze, or rust-colored paints for gears, stitches, or mechanical details.
- Optional: Add accessories like goggles, chains, or mini props.
- Use darker shades to enhance scars, cracks, or textures.
DIY Tip: Recycle old jewelry or electronics to make miniature prosthetic elements.
Pro Advice: Combining retro and modern creates unique and memorable SFX.
Global Mythology & Folklore

Features: Japanese Yokai, Norse runes, African masks, Latin American legends.
Step-by-Step:
- Research cultural or mythological inspiration.
- Apply paints or prosthetics to mimic distinctive traits (horns, masks, animal features).
- Optional: Add symbolic props (feathers, necklaces, masks).
- Blend colors/textures to create otherworldly realism.
DIY Tip: Focus on a single culture or legend to maintain cohesion.
Pro Advice: Modern SFX combined with traditional motifs creates striking visual storytelling.
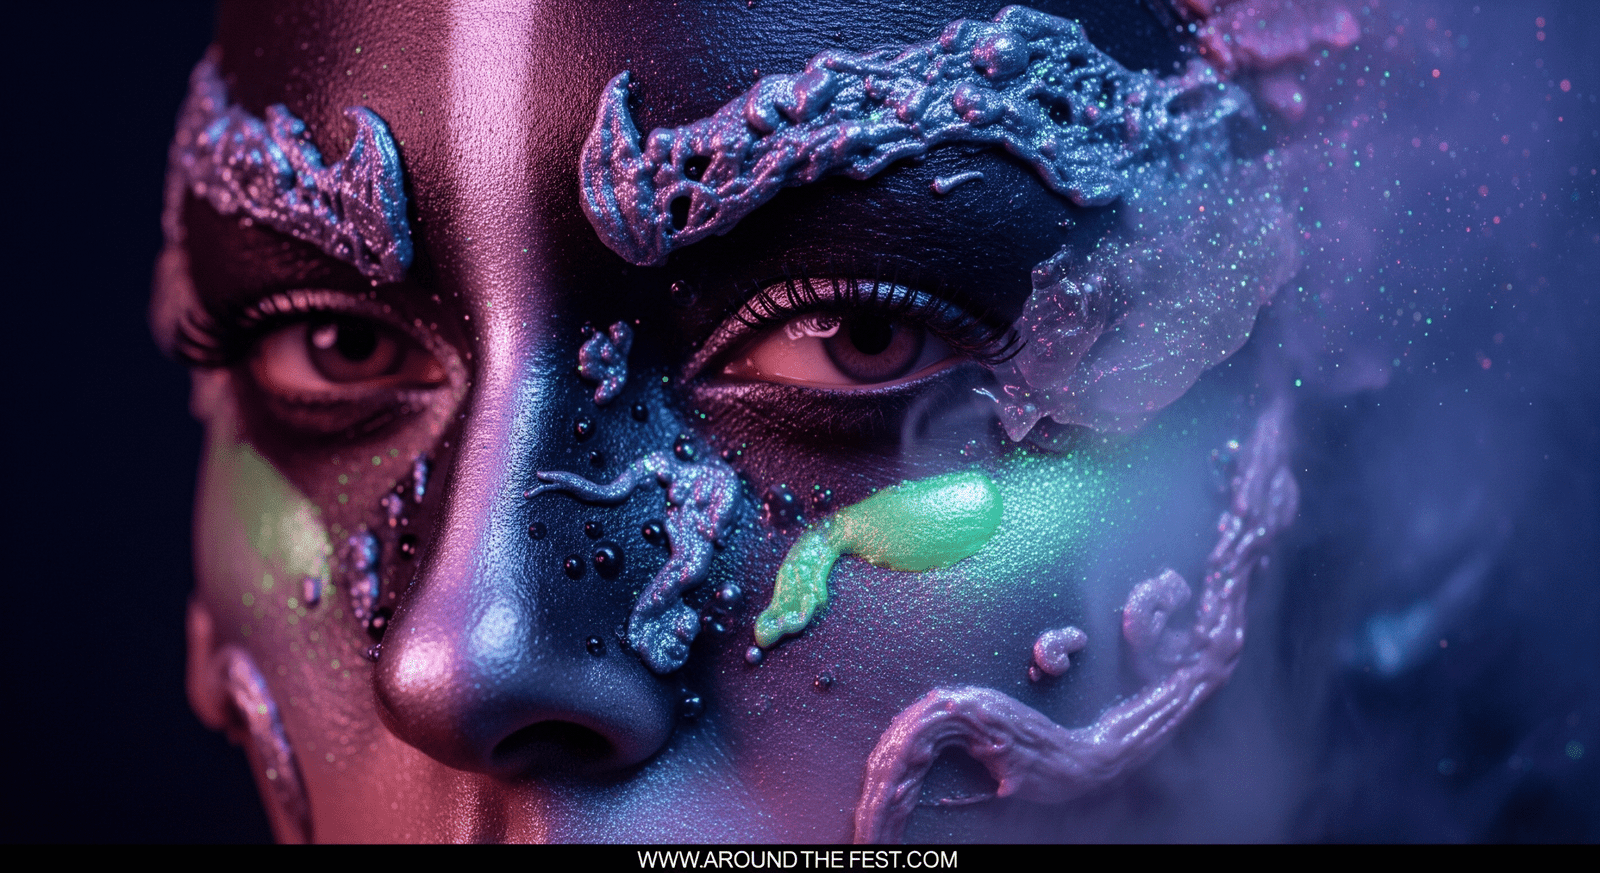
Wildcard / Experimental SFX
Features: Psychedelic horror, rusted mechanical textures, crystalline growths, hybrid cute-gore concepts.
Step-by-Step:
- Choose 2–3 experimental elements (crystal + neon + gore).
- Apply base colors and layer textures gradually.
- Add 3D accents using tissue, wax, or gel.
- Optional: Highlight edges with glitter, metallic, or UV paints.
DIY Tip: Asymmetry and surrealism enhance originality.
Pro Advice: Perfect for viral posts or avant-garde costume contests.
AI-Generated / Meta-Inspired Makeup
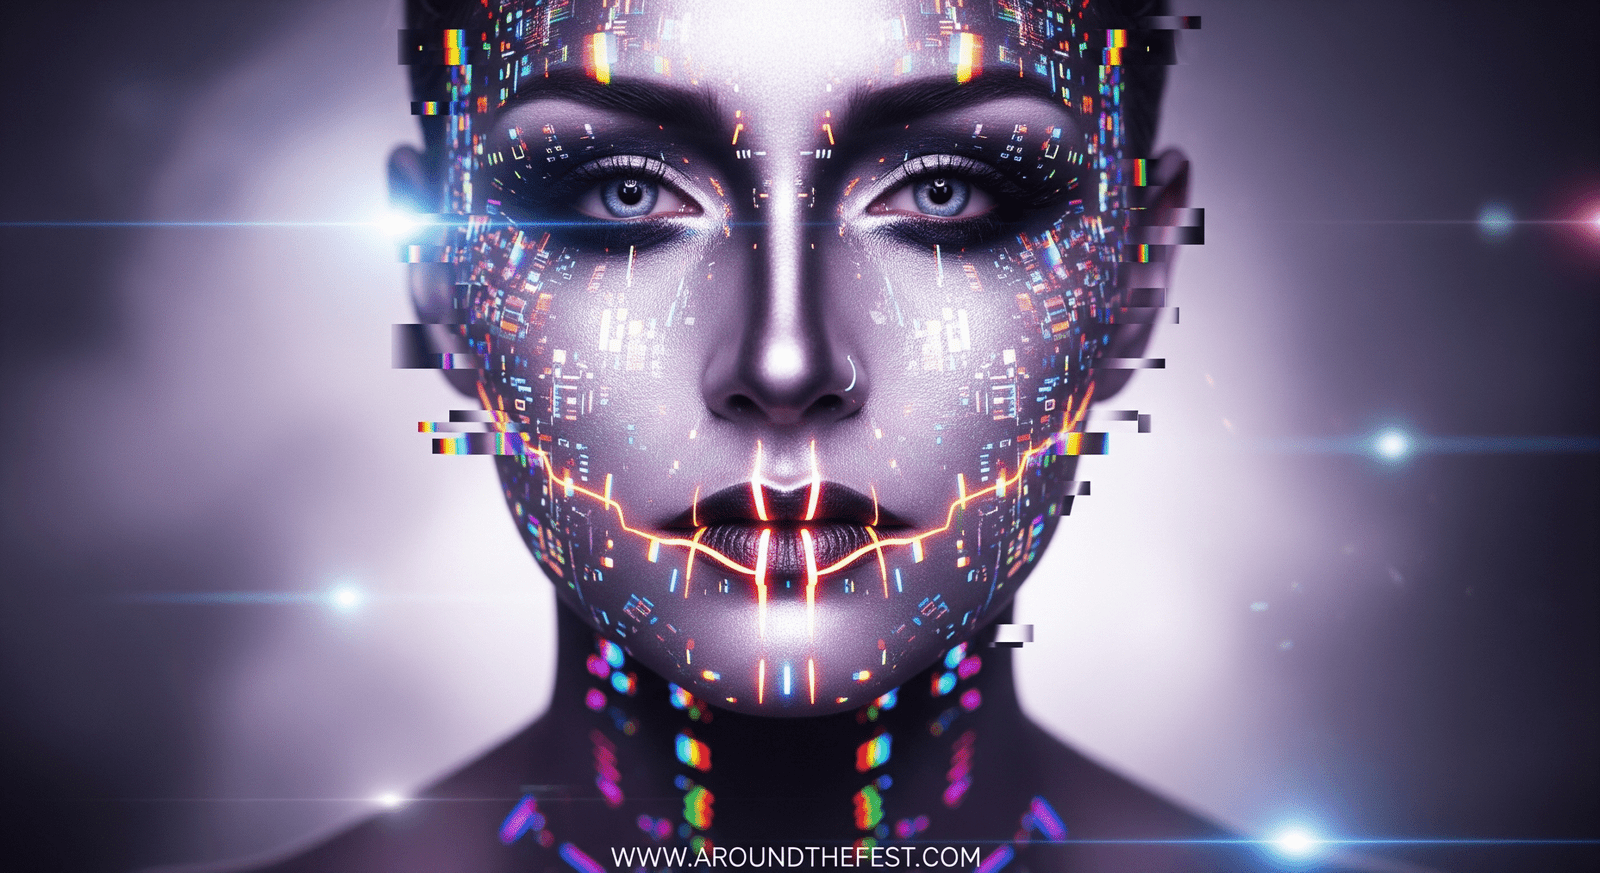
Features: Surreal patterns, algorithmic symmetry, digital distortion.
Step-by-Step:
- Pick an AI-generated art or glitch reference.
- Apply metallic or white base.
- Sketch geometric or distorted patterns with neon/holographic paints.
- Layer multiple colors for a “digital malfunction” effect.
DIY Tip: Use stamping plates for repeatable geometric designs.
Pro Advice: Works best for close-up social media shots.
Environmental Storytelling Looks
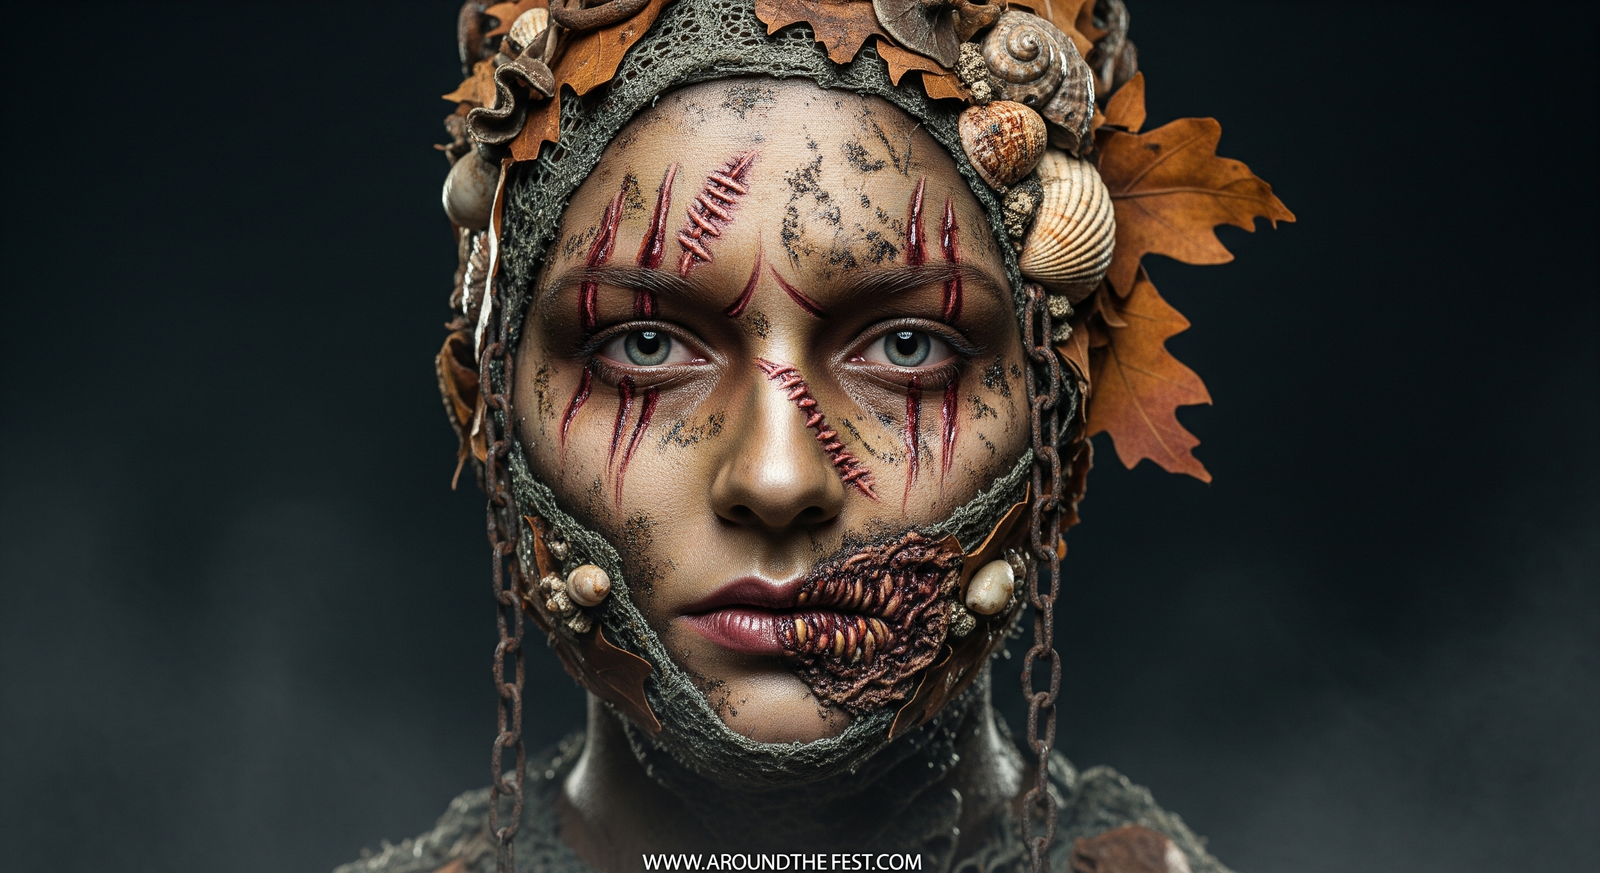
Features: Makeup that tells a narrative (post-apocalyptic survivor, haunted forest, underwater creature).
Step-by-Step:
- Select a story/theme.
- Apply base textures using dirt powders, foundations, or earthy pigments.
- Add tissue + liquid latex scars or streaks.
- Include small props like leaves, chains, or shells.
DIY Tip: Household items or natural props can create convincing textures.
Pro Advice: Highlight one main narrative element for clarity.
Multi-Sensory SFX Effects
Features: Foam or textured prosthetics, glitter “smoke,” cosmetic scents.
Step-by-Step:
- Build textured areas using foam, gelatin, or tissue + glue.
- Highlight textures with metallic or UV paints.
- Optional: Dust shimmer/glitter for movement.
- Add skin-safe scent drops in costume areas.
DIY Tip: Small sponges can create realistic 3D bumps.
Pro Advice: Perfect for immersive parties or haunted house experiences.
Viral TikTok / Social Media Challenge Looks
Features: Ultra-fast, one-feature transformations designed to go viral.
Step-by-Step:
- Pick a one-feature focus (eyes, lips, or cheek).
- Use neon or UV paints for instant pop.
- Optional: Small props (stickers, mini horns, gems).
- Film from one angle for maximum visual impact.
DIY Tip: Keep a mini kit of 2–3 products ready.
Pro Advice: Ideal for beginners or quick social media-ready SFX.
Micro-Detail SFX

Features: Tiny scars, vein textures, cracked skin patterns, micro-glitter.
Step-by-Step:
- Select a small area (temple, cheekbone, or forehead).
- Draw fine cracks, stitches, or veins with a thin brush or eyeliner.
- Add shading or shimmer for dimension.
- Optional: Highlight with UV paint under blacklight.
DIY Tip: Toothpicks or fine brushes work for intricate micro details.
Pro Advice: Micro details often outperform full-face designs in photos.
Tips for Next-Level Emerging SFX-Halloween Special Effect Makeup
- Prioritize one main feature for clarity.
- Mix textures (glossy, matte, metallic, UV) for dynamic depth.
- Keep mini props/stickers handy to elevate simple designs.
- Test under real lighting or camera filters.
- Safety: use skin-safe adhesives, pigments, and glitter; avoid sensitive areas.
- Document your look for social media or contests.
Conclusion
Halloween 2025 is shaping up to be the most creative, bold, and immersive year yet for Special Effect Makeup. From spine-chilling horror looks like vampires, zombies, haunted dolls, and neon demons to whimsical and magical designs such as pastel monsters, glitter tears, candy-inspired SFX, and ethereal mermaids, there is something for everyone—beginners, advanced SFX artists, or anyone looking for quick and easy transformations. Even last-minute and beginner-friendly ideas, like minimalist skeletons, vampire bite accents, spider web eyeliner, and pop art comic effects, can create dramatic results with minimal effort. By combining these trends with DIY hacks, budget-friendly techniques, and simple props, wigs, or accessories, you can achieve professional-looking results while having fun experimenting.